
How to Deploy Your Mission-Critical Builds in Amazon ECS Using AWS CodePipeline and Terraform?

Kishan Lashkari
Cloud Infrastructure
Published : Mar 28, 2023
Introduction
We live in an era where everyone wants everything in no time. Well, in some cases, it can happen, but for some, it requires a set of principles to streamline the whole process to make it possible, not exactly, in no time but faster than the one traditional process. And when it comes to development, DevOps makes this thing possible for developers to meet the app development requirements of clients and prospective app users in a calculative time
DevOps is a set of principles/rules that streamline processes for developers and operations teams to break the silos and work asynchronously to achieve the outcome with less time to market. But for it to be achieved, they require some tools, which we call CI/CD tools, to create the whole development to deployment pipeline.
As you can see, the market nowadays is flooded with all kinds of DevOps CI/CD tools, but choosing the best one to achieve your deployment needs is essential. If your requirement is to continuously deploy your mission-critical builds into the Amazon ECS, we recommend going for the powerful combination of AWS CodePipeline and Terraform to get the efficiency you need. Engaging with CI/CD integration services can help streamline this process and optimize your deployment strategy.
Do you want to know how this great combination of AWS CodePipeline and Terraform works together to create a CI/CD pipeline that boosts app development speed to continuously deploy builds into the Amazon ECS ecosystem? Don’t worry! This whole blog is created for that purpose—to guide you in the right direction! If you’re looking for expertise, partnering with an AWS development company can make this process even smoother.
So, shall we delve in? Let’s go:
What is an AWS CodePipeline?
AWS CodePipeline is the continuous delivery service enabling DevOps engineers to model, visualize, and streamline the software build release cycle through the quick CI/CD pipeline creation. So, that means easy development and deployment configuration processes, resulting in a helping hand for releasing software built with less time-to-market.
Now, let’s have a look at what else you can do with the AWS CodePipeline:
- Make the most use of your AWS CodePipeline to automate your continuous build release process with source repository using build, test, and deployments. In addition, you can even switch to manual action approval to stop making the processes pass through the pipeline except for the source stage. With automation, as a DevOps engineer, you also get the enablement to release the build when, however the way, on your chosen system and across instances, you would want to.
- With the build being a crucial part, there will come many changes ahead. Hence, it requires readiness to deal with those changes. With CodePipeline, you can achieve it by setting up steps and criteria for each code change to the process.
- Automate your build code while testing and releasing it consistently to give a boost to the release time even with availing new application features to stakeholders.
- Even make use of your preferential source, build, and deployment tools to the AWS Pipeline while checking its supportability for tools, along with integration guides.
- Set up and get real-time monitoring of your build testing and delivery status of the configured pipeline. With real-time monitoring, get real-time alerts on process issues, retry failed actions, and see how many times your source code has been revised at what stage and even manually process from any stage of the pipeline if required.
-
Check a detailed history of your pipeline, like pipeline start and end time, how long it ran, and execution details (IDs).
What is a Terraform?
Terraform is an Infrastructure-as-Code (IaC) tool that enables developers to configure cloud-based and on-premises resources in an easily understandable file, which then can be versioned, reused, and shared across systems. You can even utilize the continuous cycle to manage your entire infrastructure through a well-configured lifecycle.
With Terraform, you can manage low-level infrastructure components, like storage, computing, and network resources, along with high-level components, including DNS data and SaaS features.
How does Terraform work?
Terraform mainly works in three critical stages: Write, Plan, and Apply. Let’s know them in a bit more depth:
- Write a terraforming project by defining Terraform configuration and Terraform state file;
- Plan to review changes done by Terraform to your mission-critical IT infrastructure;
- Apply the method to enable Terraform to provision infrastructure and make some amendments to the Terraform state files
Now, you do want to know the benefits to reap out by using AWS CodePipeline and Terraform together! It’s the next!
Why should you use AWS CodePipeline and Terraform Together?
Using the AWS CodePipeline and Terraform together, you can unlock several benefits, including:
- Continuous infrastructure deployments;
- Quicker and more efficient deployments;
- Improved collaboration and communications amongst developers, operations teams, and app project stakeholders;
- Easy build rollbacks and recovery from failures, resulting in a reduction in the app’s downtime and improved user experience;
- Easy tracking of code changes and management of infrastructure through a single source of truth.
How You Can Use AWS CodePipeline and Terraform together to Continuously Deploy Your Build in Amazon ECS
Now, the moment we all were waiting for! So, let’s dive into this technical guide to continuously deploy the app into Amazon ECS using AWS CodePipeline and Terraform.
Prerequisites
Let’s go through some prerequisites first before starting with the main process.
- AWS Platform account
- Configured VPCs and Subnets on AWS
- AWS ECR Repository
- Terraform account
- A Python Flask web application with Dockerfile
Now, let’s take a look at the architectural process we’ll follow throughout the project:
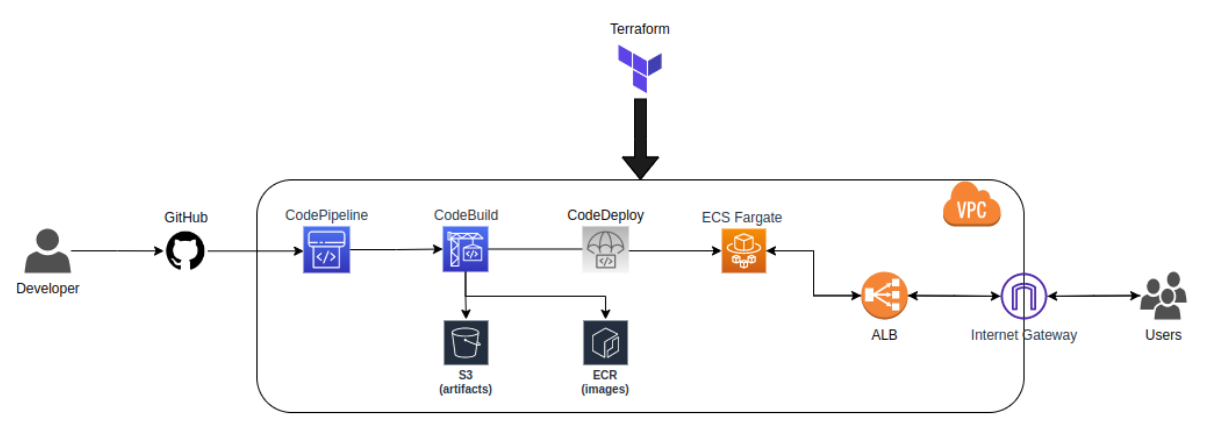
Following image seems more appealing to me.
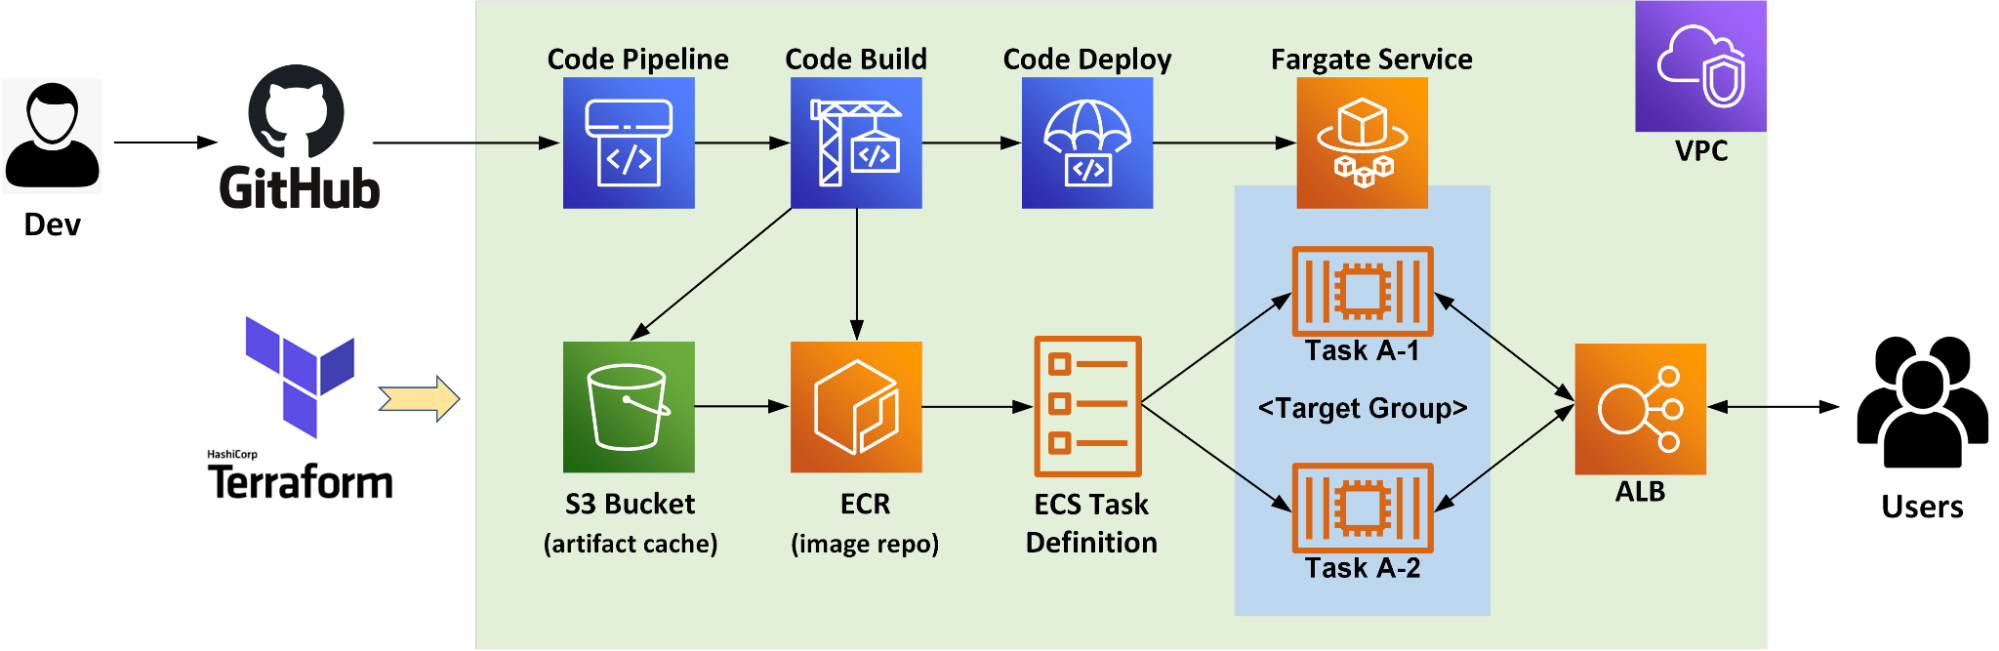
Here, the major components for implementation are:
- GitHub for the source code repository; (You can have any other repository.)
- Terraform for easy management of resource provisioning.
- AWS CodePipeline to continuously deploy the app builds;
- Amazon ECR (Elastic Container Registry) for repository docker images in a secure, scalable, and reliable manner;
- Amazon ECS (Elastic Container Service) to host the application;
- AWS Farget to run container tasks eliminating the need to manage servers or Amazon EC2 instances and VMs’ provisioning, configuration, or scaling needs;
-
ALB (AWS Application Load Balancer) to pass user requests to running ECS task and balance load.
STEP 1: Set Up ECS With the Help of Terraform
Let’s make the destination ready before delving into the pipeline to streamline the continuous deployment of build releases. And for that, let’s create start with creating three files:
1. variables.tf to store reference variables
variable "aws_region" {
  default = "<region>"
}
variable "vpc_id" {
  default = "<vpc-id>"
}
variable "subnets" {
  type = list(string)
  default = [
    "subnet-<subnet-1>",
    "subnet-<subnet-2>",
    "subnet-<subnet-n>"
  ]
}
variable "image_tag" {
  default = "latest"
}
variable "image_repo_url" {
  default = "<account-id>.dkr.ecr.<region>.amazonaws.com/<repository>"
}
This showcases the necessary dependencies.
Now, let’s associate VPC and subnets with Amazon ECS resources to seamlessly provision the ECS cluster.
🤔Knowledge Sharing
An Amazon ECS cluster is created by logically grouping compute tasks or services, running on infrastructure and registered to a cluster. Here, then the infrastructure capacity in your ECS cluster will be facilitated by the AWS Fargate – a serverless infrastructure managed by AWS, a cluster of Amazon EC2 instances managed by you, or a VMs/On-premises server managed remotely. However, in most cases, therein used Amazon ECS capacity providers for the same.
Well, it can be done in two distinct ways as we are using Terraform, such as:
- Provisioning those using Terraform and dynamically associating those to the ECS resources; or
- Use an already configured VPC and subnets.
As you have gone through the prerequisites already, which you definitely have 😜, we’ll pick the second option.
As we are using containers for deploying the application into ECS, we have to push the docker images to a content registry system, like Docker Hub, Elastic Container Register (ECR), Google Container Registry (GCR), etc. But we are using ECR so we’ll push all those images into the ECR.
To do so, we’ll create an ECR repository. Well, whether to keep the repository private or public is totally up to your requirements. Here, we’re going to keep the ECR repository, Private. See below:
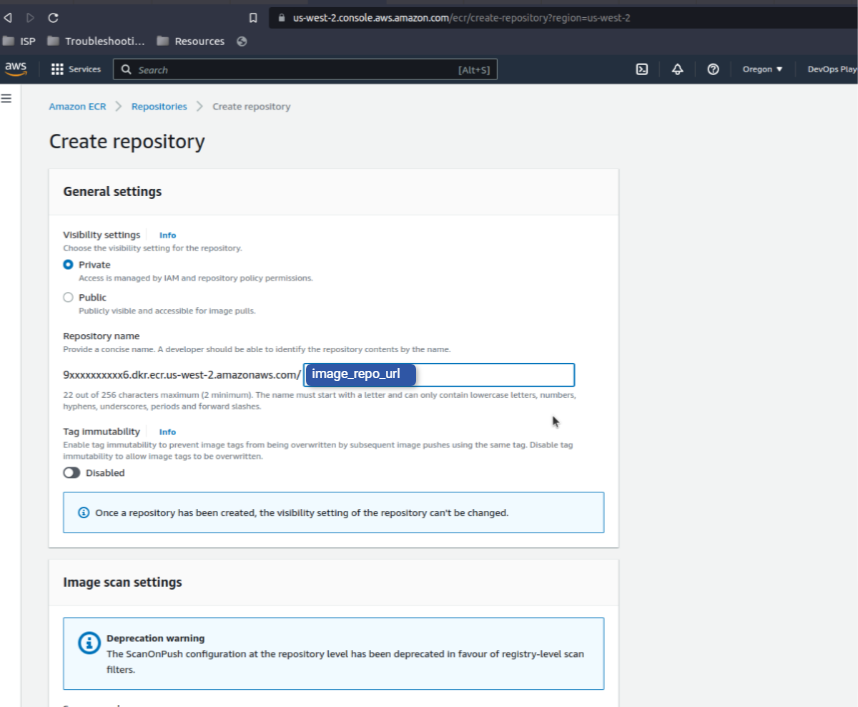
Here, we’ve named the url as “image_repo_url” above as shown in the image.
A point to remember! From now on, when we build and push a new image into the ECR, ensure to tag the image. Also, we’ll name every new version tag as the latest with the intention to overwrite the previous image versions.
Now, all required variables for the ECS cluster creation are ready to use!
2. provider.tf to set up providers
provider "aws" {
  region = var.aws_region
}
When planning to run CI/CD terraform effectively, it’s important to log into the AWS account locally. Confirm that, we’ run the following command:
$ aws configure
Also, refer to this guide to use the AWS CLI effortlessly
2. ecs.tf to set up resources
resource "aws_ecs_cluster" "flask_app_demo" {
  name = "flask-app-demo"
}
resource "aws_ecs_task_definition" "flask_app_demo" {
  family                   = "flask-app-demo"
  network_mode             = "awsvpc"
  requires_compatibilities = ["FARGATE"]
  cpu                      = "256"
  memory                   = "512"
  container_definitions = DEFINITION
[
  {
    "name": "flask-app-demo",
    "image": "${var.image_repo_url}:${var.image_tag}",
    "essential": true,
    "portMappings": [
      {
        "containerPort": 5000,
        "hostPort": 5000
      }
    ],
    "logConfiguration": {
      "logDriver": "awslogs",
      "options": {
        "awslogs-group": "${aws_cloudwatch_log_group.flask_app_demo.name}",
        "awslogs-region": "${var.aws_region}",
        "awslogs-stream-prefix": "flask-app-demo"
      }
    }
  }
]
DEFINITION
  execution_role_arn = aws_iam_role.task_definition_role.arn
  runtime_platform {
    operating_system_family = "LINUX"
    cpu_architecture        = "X86_64"
  }
}
resource "aws_cloudwatch_log_group" "flask_app_demo" {
  name = "/ecs/flask-app-demo"
}
resource "aws_ecs_service" "flask_app_demo" {
  name            = "flask-app-demo"
  cluster         = aws_ecs_cluster.flask_app_demo.id
  task_definition = aws_ecs_task_definition.flask_app_demo.arn
  desired_count   = 1
  launch_type     = "FARGATE"
  network_configuration {
    subnets         = var.subnets
    security_groups = [aws_security_group.flask_app_demo.id]
    assign_public_ip = true
  }
  load_balancer {
    target_group_arn = aws_lb_target_group.flask_app_demo.arn
    container_name   = "flask-app-demo"
    container_port   = 5000
  }
}
resource "aws_security_group" "flask_app_demo" {
  name        = "flask-app-demo"
  description = "Allow inbound traffic to flask app"
  vpc_id      = var.vpc_id
  ingress {
    description      = "Allow HTTP from anywhere"
    from_port        = 0
    to_port          = 0
    protocol         = "-1"
    cidr_blocks      = ["0.0.0.0/0"]
    ipv6_cidr_blocks = ["::/0"]
  }
   egress {
    from_port        = 0
    to_port          = 0
    protocol         = "-1"
    cidr_blocks      = ["0.0.0.0/0"]
    ipv6_cidr_blocks = ["::/0"]
  }
}
resource "aws_lb_target_group" "flask_app_demo" {
  name        = "flask-app-demo"
  port        = 5000
  protocol    = "HTTP"
  vpc_id      = var.vpc_id
  target_type = "ip"
  health_check {
    path                = "/"
    interval            = 30
    timeout             = 10
    healthy_threshold   = 2
    unhealthy_threshold = 2
  }
}
resource "aws_lb" "flask_app_demo" {
  name               = "flask-app-demo"
  internal           = false
  load_balancer_type = "application"
  security_groups    = [aws_security_group.flask_app_demo.id]
  subnets            = var.subnets
  enable_deletion_protection = false
  tags = {
    Name = "flask-app-demo"
  }
}
resource "aws_lb_listener" "flask_app_demo" {
  load_balancer_arn = aws_lb.flask_app_demo.arn
  port              = "80"
  protocol          = "HTTP"
  default_action {
    type             = "forward"
    target_group_arn = aws_lb_target_group.flask_app_demo.arn
  }
}
resource "aws_lb_listener_rule" "flask_app_demo" {
  listener_arn = aws_lb_listener.flask_app_demo.arn
  priority     = 1
  action {
    type             = "forward"
    target_group_arn = aws_lb_target_group.flask_app_demo.arn
  }
  condition {
    path_pattern {
      values = ["/"]
    }
  }
}
resource "aws_iam_role" "task_definition_role" {
  name = "flask_demo_task_definition"
  assume_role_policy = EOF
{
  "Version": "2012-10-17",
  "Statement": [
    {
      "Action": "sts:AssumeRole",
      "Principal": {
        "Service": "ecs-tasks.amazonaws.com"
      },
      "Effect": "Allow",
      "Sid": ""
    }
  ]
}
EOF
}
resource "aws_iam_role_policy" "task_definition_policy" {
  name = "flask_demo_task_definition_policy"
  role = aws_iam_role.task_definition_role.id
  policy = EOF
{
  "Version": "2012-10-17",
  "Statement": [
    {
      "Effect": "Allow",
      "Action": [
        "ecr:BatchCheckLayerAvailability",
        "ecr:GetAuthorizationToken",
        "ecr:GetDownloadUrlForLayer",
        "ecr:BatchGetImage",
        "logs:CreateLogStream",
        "logs:PutLogEvents",
        "secretsmanager:GetSecretValue",
        "ssm:GetParameters"
      ],
      "Resource": [
        "*"
      ]
    }
  ]
}
EOF
}
This block of code contains three types of configurations.
- line 1-3 to create a cluster “flash-app-demo“)
- line 4-38 for task definition
- line 39-41 to create a CloudWatch log group for cluster monitoring
- line 42-58 to create an ECS service
Here, Amazon ECS service can be used to process and manage specific task definition instances simultaneously inside the cluster.
In case of one task failure, the Amazon ECS service scheduler instantly launches another instance for replacing the same.
📝Note: the launch_type should be FARGATE to ensure that the build is deployed into the AWS Fargate service. Amongst various reasons, Farget has been chosen for easy management soon as it eliminates much of the overhead for the same.
II. Network-based configuration
After those lines, L59-125 focuses on the Network configuration. If being too specific, it shows the configuration of the AWS security group using Terraform, and it enables us to limit network boundaries for incoming and outgoing traffic.
In addition to that, we’ll also set up load-balancing resources to have a sight on traffic and create a load balancer for the application. For more information, do refer to the Terraform guide for the same.
III. IAM configuration
Now, further, the remaining code lines are for configuring the ECS permission resources that can engage with ECR for logging.
Let’s do the AWS configuration:
-
Initializing the directory: $ terraform init
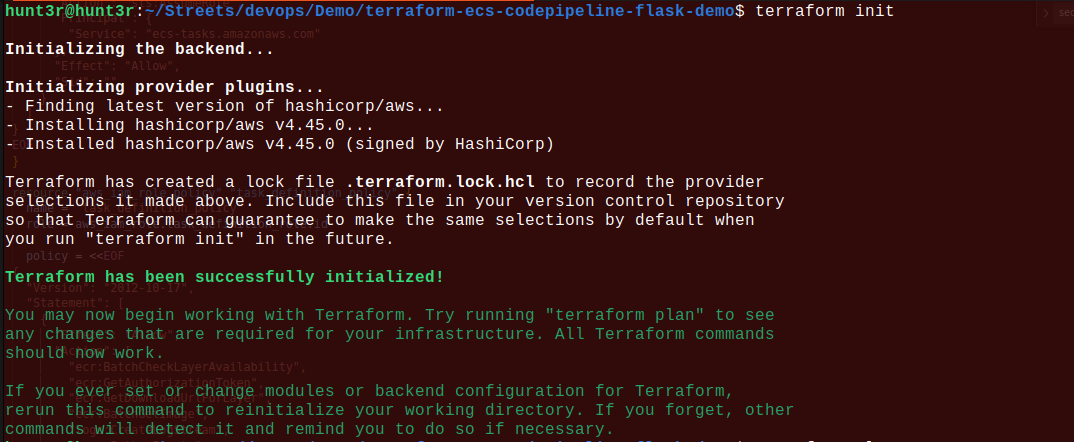
- Plan to create the infrastructure: $ terraform plan
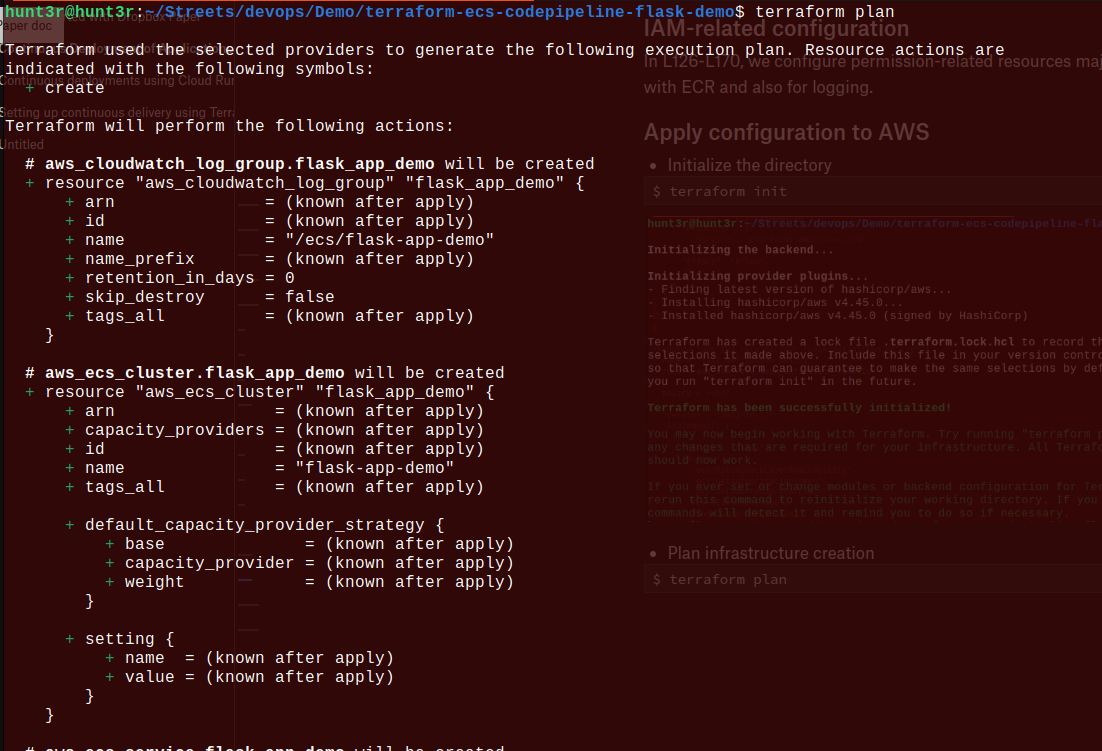
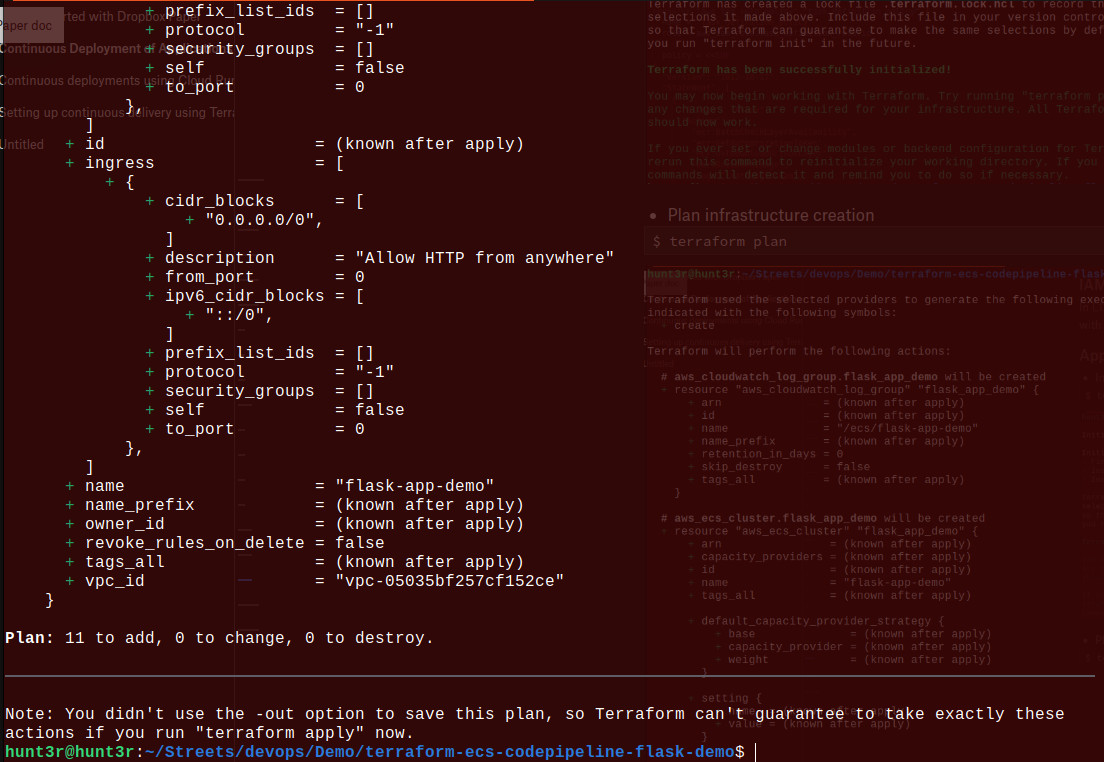

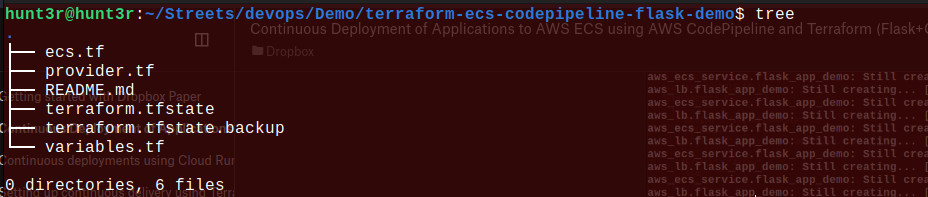
Now, you can see the Terraform generated files:
Now, it’s time to verify the implementation.
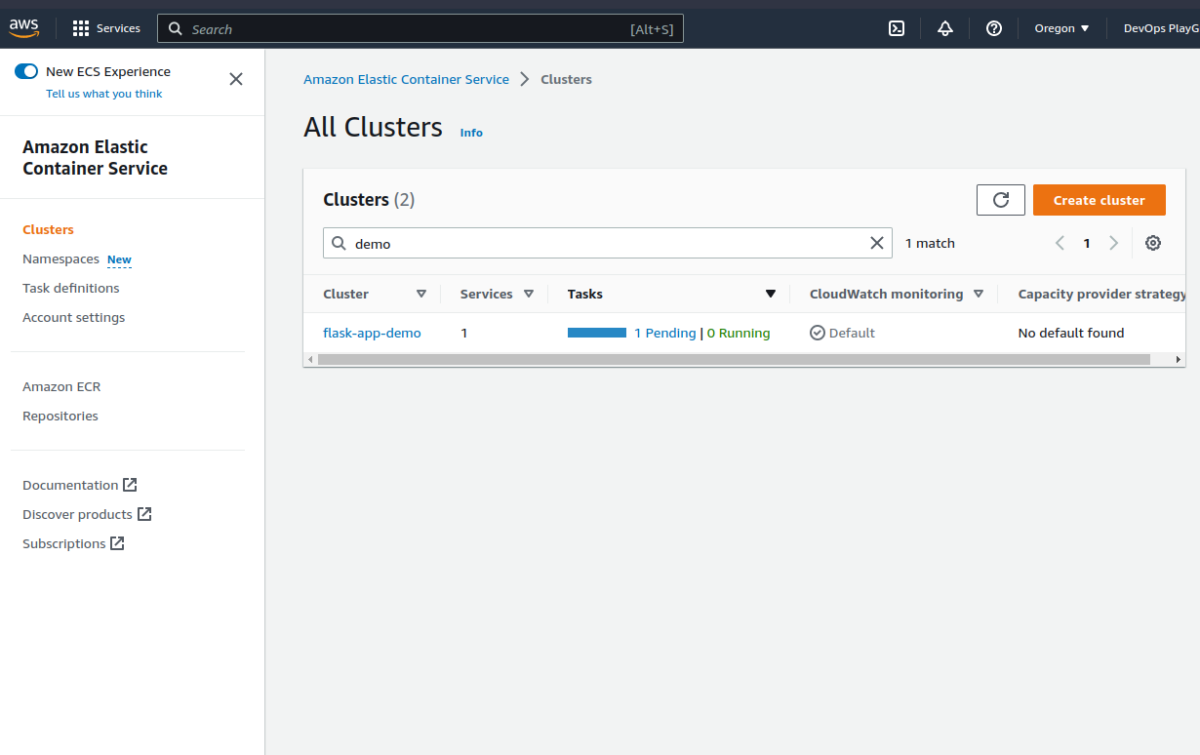
For that, go to the Amazon Elastic Container Services page to start with the verification process:
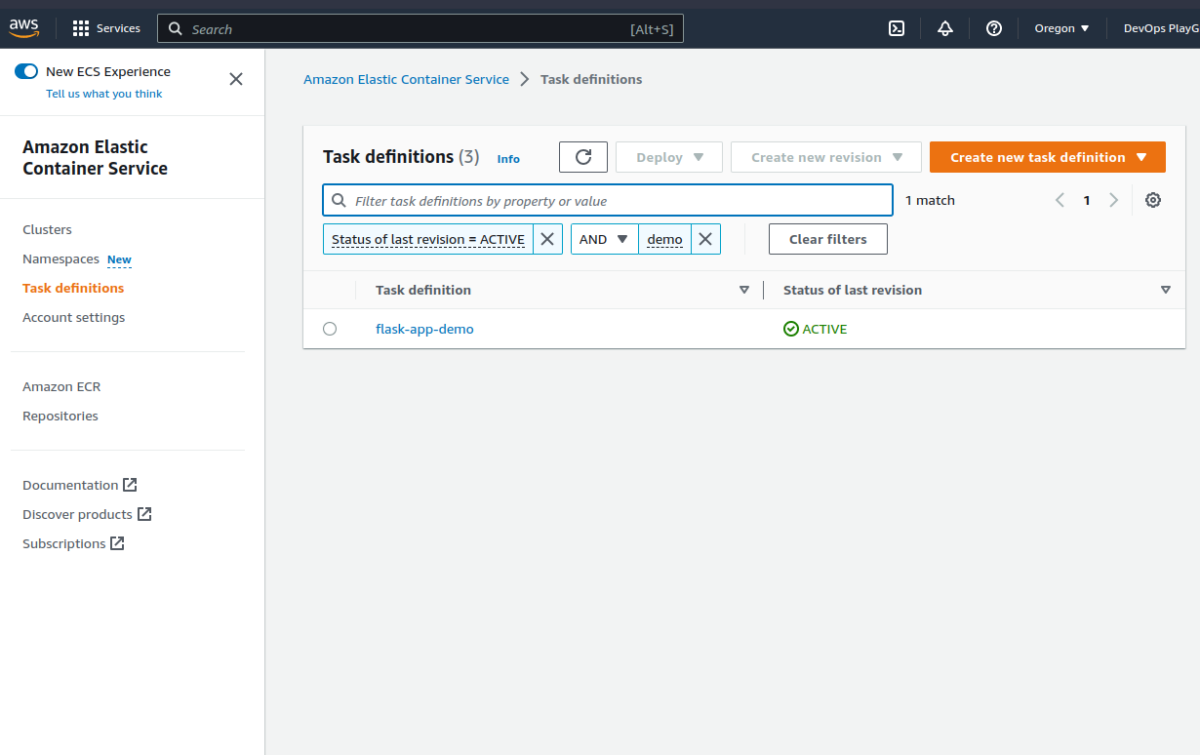
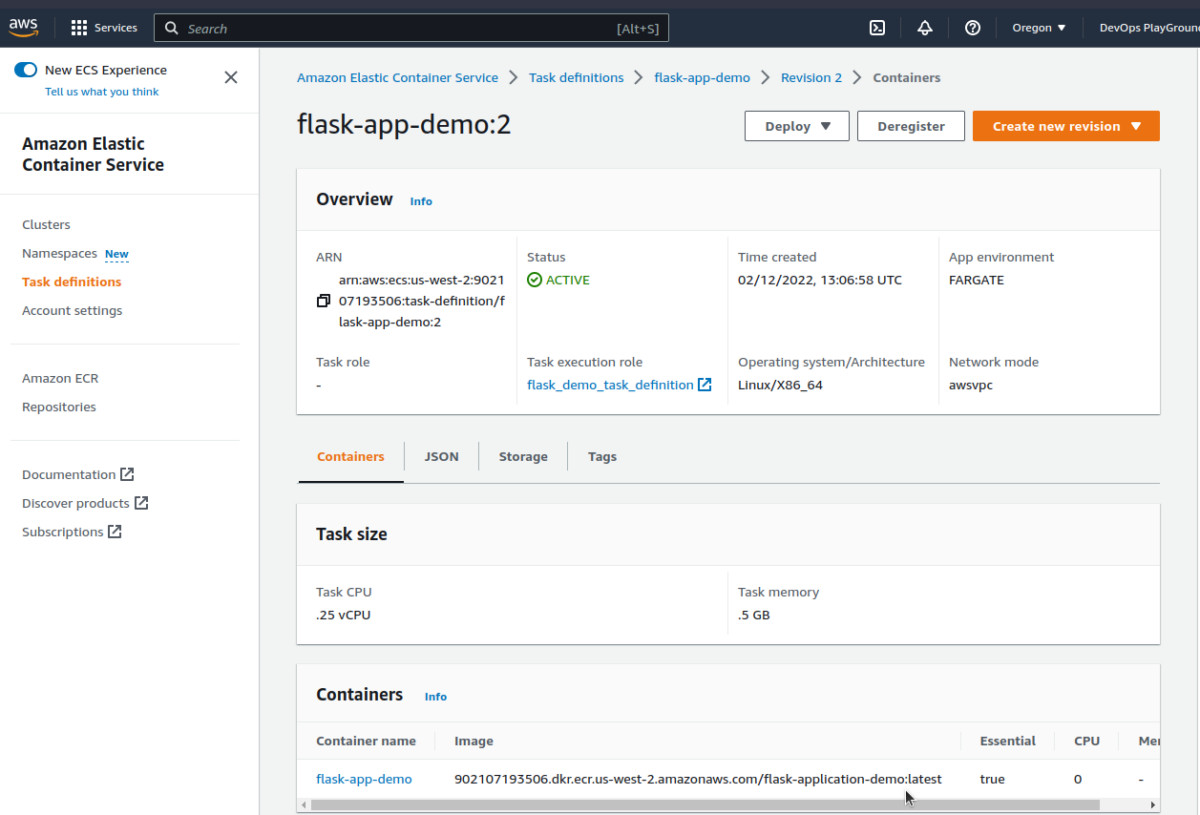
Can you see the task definition linked to the appropriate image in the ECR cluster? Yes! Great Job!
Level 1 achieved! 🥳
But note that 📝, this is still not in its working phase as it is still pending to push the flask application in.
🚨Be careful of the information you make available.
Worry not! Let’s move to the next step, which is the deployment stage!
Bonus 🎁:
In addition to this method, you can also create a backend.tf file to store the Terraform State configuration file on the cloud ecosystem (Amazon S3, to be precise).
STEP 2: Configure AWS CodePipeline Using Terraform
It’s time to prepare the Flask application and push it into the docket.
Let’s start with running your mission-critical build locally: $ pip install flask.
And then create a basic Flask app: flask_app/app.py
from flask import Flask
app = Flask(__name__)
@app.route("/")
def hello():
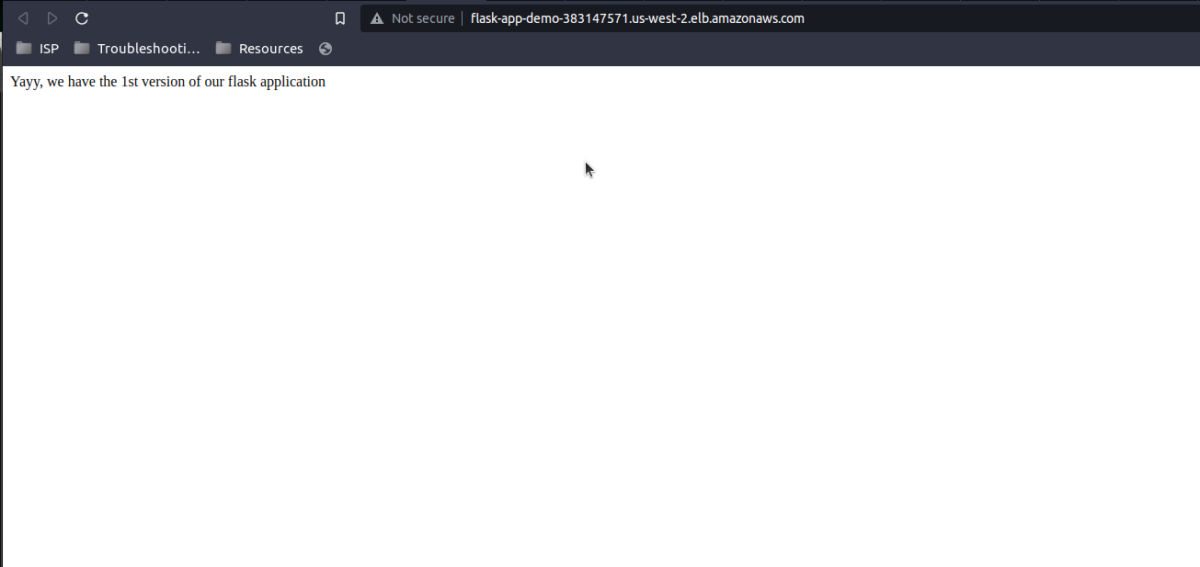
return "Yayy, we have the 1st version of our flask application"
if __name__ == "__main__":
app.run(host="0.0.0.0")
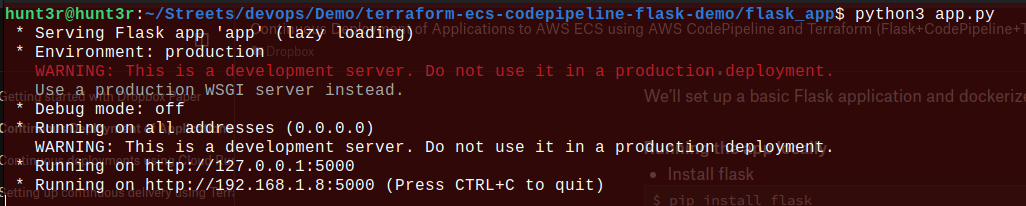
Write a command to run the app: $ python3 flask_app/app.py
Now, let’s dockerize the app with the command to create a Dockerfile :flask_app/Dockerfile
FROM public.ecr.aws/bitnami/python:3.9
RUN pip install flask
COPY app.py ./app.py
CMD ["python", "app.py"]
Caution: Here, we avoided using FROM python: 3.8 as the Docker hub has some download restrictions, resulting in an app building up the block.
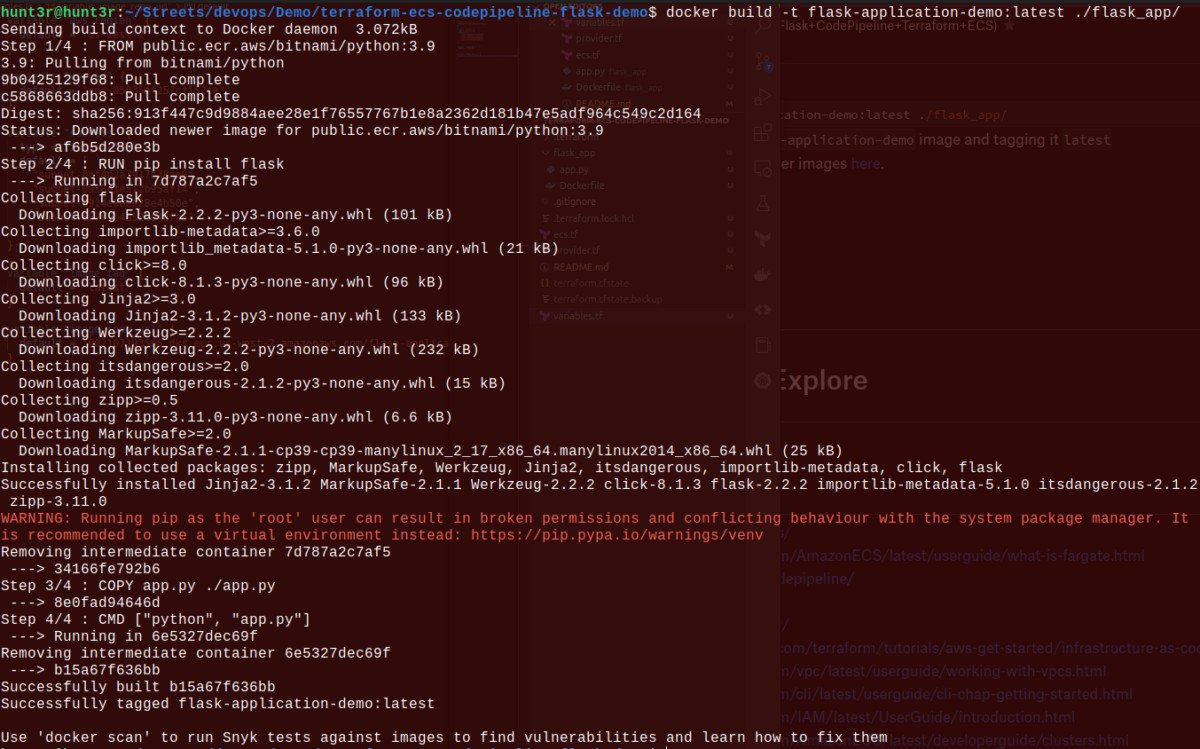
Now, let’s build the docker image with the command: docker build -t flask-application-demo:latest ./flask_app/
This will create the flash-application-demo image and tag it with the label latest, as we’ve discussed in the beginning to overlap the older image.
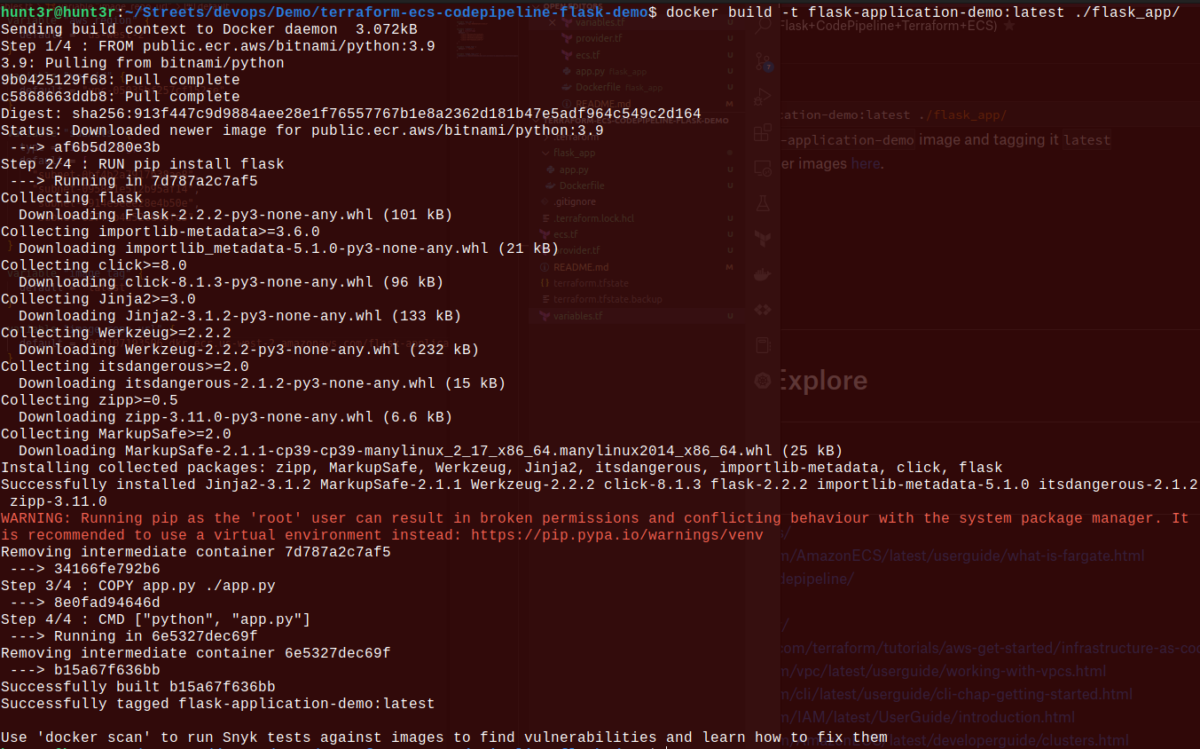
Want to know whether the image has been built or not? Let’s check it: $ docker image ls

It’s confirmed now that the Flask app image has been created! Hurray!! So, it’s time to run the Docker container: $ docker run -d -p 5000:5000 flask-application-demo
![]()
At last visit the local URL you’ve been using to check the ready build of the Flask application.
As the local setup of the app is ready, it’s time to move ahead toward the CodePipeline configuration to deploy the build as we push it to GitHub.
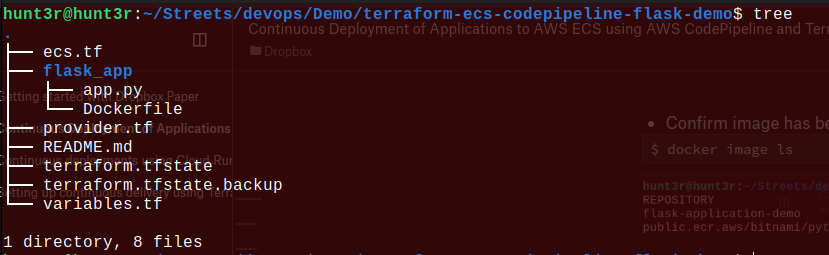
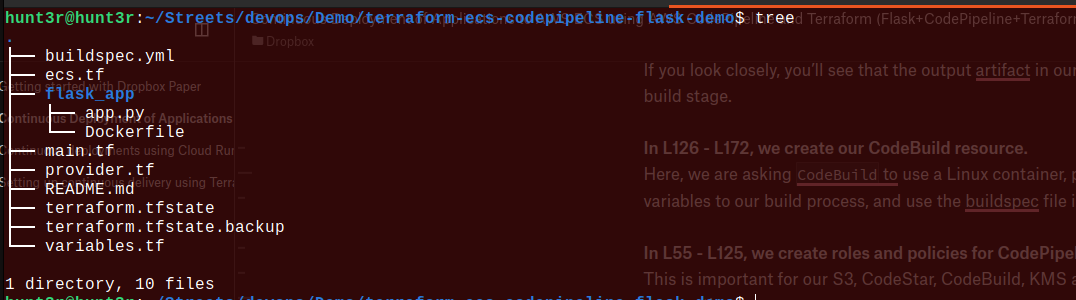
Check-in time to see how the directory tree looks like:
The BuildSpec Activities in AWS CodeBuild
It stands for build specification made of a set of build commands and relatable YAML formatted settings used by CodeBuild to successfully run the build.
Apart from the locals, you can even use BuildSpec to build images that we’ve just done locally and push them to ECS task definitions to deploy the basic Flask application
Let’s have a look at the buildspec.yaml code fil
# Buildspec to pull the latest version of the Docker image from docker
hub and deploy it to the ECS cluster
version: 0.2
phases:
  install:
    runtime-versions:
      docker: 18
  pre_build:
    commands:
      - echo Logging in to Amazon ECR....
      - echo $AWS_ACCOUNT_ID - $AWS_DEFAULT_REGION - $IMAGE_REPO_NAME -
$IMAGE_TAG
      - aws --version
      - aws ecr get-login-password --region $AWS_DEFAULT_REGION | docker
 login --username AWS --password-stdin
 $AWS_ACCOUNT_ID.dkr.ecr.$AWS_DEFAULT_REGION.amazonaws.com
      - export
 REPOSITORY_URI=$AWS_ACCOUNT_ID.dkr.ecr.$AWS_DEFAULT_REGION.amazonaws.com/
$IMAGE_REPO_NAME
      - echo Build started on `date`
      - echo Building the Docker image...
      - docker build -t $IMAGE_REPO_NAME:$IMAGE_TAG ./flask_app
      - docker tag $IMAGE_REPO_NAME:$IMAGE_TAG $REPOSITORY_URI:$IMAGE_TAG
  build:
    commands:
      - echo Pushing the Docker image to ECR...
      - echo $REPOSITORY_URI:$IMAGE_TAG
      - docker push $REPOSITORY_URI:$IMAGE_TAG
  post_build:
    commands:
      - echo Build completed on `date`
      - echo Deploying new task definition $IMAGE_TAG to ECS cluster...
      - echo ECS_CLUSTER_NAME - $ECS_SERVICE_NAME, ECS_SERVICE_NAME
 - $ECS_SERVICE_NAME
      - aws ecs update-service --cluster $ECS_CLUSTER_NAME --service
 $ECS_SERVICE_NAME --task-definition $ECS_TASK_DEFINITION
 --force-new-deployment
       - echo ECS service $ECS_SERVICE_NAME updated
Here, the buildspec is parted into four stages:
- Install packages
- pre_build to log into the ECR and create the image with the Dockerfile stored in the flask_app folder.
- build to push the images to ECR.
- post_build to update the ECS task definition to add the latest version of the flask app image in ECR overlapping the old image.
It does require some variables to build and deploy the application, which will be covered in the section.
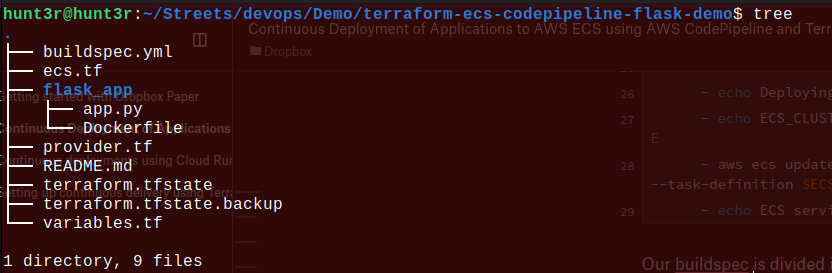
Again check the directory tree for more confirmation:
Let’s Finally Set Up the AWS CodePipeline
The pipeline we are going to configure will be solely responsible for linking AWS to a GitHub repository, finding the mission-critical app, and implementing and deploying it as per the given buildspec setup.
As discussed above, let’s first create some variables in the file variables.tf:
variable "aws_account_id" {
  default = "902107193506"
}
variable "aws_region" {
  default = "us-west-2"
}
variable "vpc_id" {
  default = ""
}
variable "subnets" {
  type = list(string)
  default = [
    "subnet-",
    "subnet-",
    "subnet-"
  ]
}
variable "image_repo_name" {
  default = "flask-application-demo"
}
variable "image_tag" {
  default = "latest"
}
variable "image_repo_url" {
  default = ".dkr.ecr..amazonaws.com/"
}
variable "github_repo_owner" {
  default = "m3rryqold"
}
variable "github_repo_name" {
  default = "terraform-ecs-codepipeline-flask-demo"
}
variable "github_branch" {
  default = "main"
}
Now, the CodePipeline has been loaded with some required variables, especially for the GitHub repository. Moving on to the next step to create the main.tf file:
resource "aws_codepipeline" "codepipeline" {
  name     = "flask_demo_pipeline"
  role_arn = aws_iam_role.codepipeline_role.arn
  artifact_store {
    location = aws_s3_bucket.codepipeline_bucket.bucket
    type     = "S3"
    encryption_key {
      id   = data.aws_kms_alias.s3kmskey.arn
      type = "KMS"
    }
  }
  stage {
    name = "Source"
    action {
      name             = "Source"
      category         = "Source"
      owner            = "AWS"
      provider         = "CodeStarSourceConnection"
      version          = "1"
      output_artifacts = ["source_output"]
      configuration = {
        ConnectionArn    = aws_codestarconnections_connection.example.arn
        FullRepositoryId = "${var.github_repo_owner}/${var.github_repo_name}"
        BranchName       = var.github_branch
      }
    }
  }
  stage {
    name = "Build"
    action {
      name             = "Build"
      category         = "Build"
      owner            = "AWS"
      provider         = "CodeBuild"
      input_artifacts  = ["source_output"]
      output_artifacts = ["build_output"]
      version          = "1"
      configuration = {
        ProjectName = aws_codebuild_project.flask_app.name
      }
    }
  }
}
resource "aws_codestarconnections_connection" "example" {
  name          = "flask-demo-connection"
  provider_type = "GitHub"
}
resource "aws_s3_bucket" "codepipeline_bucket" {
  bucket = "flask-demo-codepipeline-bucket"
}
resource "aws_s3_bucket_acl" "codepipeline_bucket_acl" {
  bucket = aws_s3_bucket.codepipeline_bucket.id
  acl    = "private"
}
resource "aws_iam_role" "codepipeline_role" {
  name = "flask_demo_codepipeline_role"
  assume_role_policy = EOF
{
  "Version": "2012-10-17",
  "Statement": [
    {
      "Sid": "TrustPolicyStatementThatAllowsEC2ServiceToAssumeTheAttachedRole",
      "Effect": "Allow",
      "Principal": {
        "Service": "codepipeline.amazonaws.com"
      },
      "Action": "sts:AssumeRole"
    }
  ]
}
EOF
}
resource "aws_iam_role_policy" "codepipeline_policy" {
  name = "flask_demo_codepipeline_policy"
  role = aws_iam_role.codepipeline_role.id
  policy = EOF
{
  "Version": "2012-10-17",
  "Statement": [
    {
      "Effect":"Allow",
      "Action": [
        "s3:GetObject",
        "s3:GetObjectVersion",
        "s3:GetBucketVersioning",
        "s3:PutObjectAcl",
        "s3:PutObject",
        "iam:GetRole",
        "iam:PassRole"
      ],
      "Resource": [
        "${aws_s3_bucket.codepipeline_bucket.arn}",
        "${aws_s3_bucket.codepipeline_bucket.arn}/*",
        "*"
      ]
    },
    {
      "Effect": "Allow",
      "Action": [
        "codestar-connections:UseConnection"
      ],
      "Resource": "${aws_codestarconnections_connection.example.arn}"
    },
    {
      "Effect": "Allow",
      "Action": [
        "codebuild:BatchGetBuilds",
        "codebuild:StartBuild"
      ],
      "Resource": "*"
    },
    {
      "Effect": "Allow",
      "Action": [
        "cloudformation:DescribeStacks",
        "kms:GenerateDataKey",
        "iam:GetRole",
        "iam:PassRole"
      ],
      "Resource": "*"
    }
  ]
}
EOF
}
resource "aws_codebuild_project" "flask_app" {
  name          = "flask-app-demo"
  description   = "Builds a flask application"
  service_role  = aws_iam_role.codebuild_role.arn
  build_timeout = "5"
  artifacts {
    type = "CODEPIPELINE"
  }
  environment {
    compute_type    = "BUILD_GENERAL1_SMALL"
    image           = "aws/codebuild/standard:2.0"
    type            = "LINUX_CONTAINER"
    privileged_mode = true
    environment_variable {
      name  = "AWS_ACCOUNT_ID"
      value = var.aws_account_id
    }
    environment_variable {
      name  = "AWS_DEFAULT_REGION"
      value = var.aws_region
    }
    environment_variable {
      name  = "IMAGE_REPO_NAME"
      value = var.image_repo_name
    }
    environment_variable {
      name  = "IMAGE_TAG"
      value = var.image_tag
    }
    environment_variable {
      name  = "ECS_CLUSTER_NAME"
      value = aws_ecs_cluster.flask_app_demo.name
    }
    environment_variable {
      name  = "ECS_SERVICE_NAME"
      value = aws_ecs_service.flask_app_demo.name
    }
    environment_variable {
      name  = "ECS_TASK_DEFINITION"
      value = aws_ecs_task_definition.flask_app_demo.family
    }
  }
  source {
    type      = "CODEPIPELINE"
    buildspec = "buildspec.yml"
  }
}
resource "aws_iam_role" "codebuild_role" {
  name = "flask_demo_codebuild_role"
  assume_role_policy = EOF
{
  "Version": "2012-10-17",
  "Statement": [
    {
      "Action": "sts:AssumeRole",
      "Principal": {
        "Service": "codebuild.amazonaws.com"
      },
      "Effect": "Allow",
      "Sid": "TrustPolicyStatementThatAllowsEC2ServiceToAssumeTheAttachedRole"
    }
  ]
}
EOF
}
resource "aws_iam_role_policy" "codebuild_policy" {
  name = "flask_demo_codebuild_policy"
  role = aws_iam_role.codebuild_role.id
  policy = EOF
{
  "Version": "2012-10-17",
  "Statement": [
    {
      "Action": [
        "logs:CreateLogGroup",
        "logs:CreateLogStream",
        "logs:PutLogEvents"
      ],
      "Resource": "arn:aws:logs:*:*:*",
      "Effect": "Allow"
    },
    {
      "Action": [
        "s3:GetObject",
        "s3:GetObjectVersion",
        "s3:GetBucketVersioning"
      ],
      "Resource": [
        "arn:aws:s3:::${aws_s3_bucket.codepipeline_bucket.bucket}",
        "arn:aws:s3:::${aws_s3_bucket.codepipeline_bucket.bucket}/*"
      ],
      "Effect": "Allow"
    },
    {
      "Action": [
        "ecr:BatchCheckLayerAvailability",
        "ecr:CompleteLayerUpload",
        "ecr:GetAuthorizationToken",
        "ecr:InitiateLayerUpload",
        "ecr:PutImage",
        "ecr:UploadLayerPart"
      ],
      "Resource": [
        "*"
      ],
        "Effect": "Allow"
    },
    {
      "Action": [
        "ecs:UpdateService",
        "iam:GetRole",
        "iam:PassRole"
      ],
      "Resource": [
        "*"
      ],
        "Effect": "Allow"
    }
  ]
}
EOF
}
data "aws_kms_alias" "s3kmskey" {
  name = "alias/flask_app_s3kmskey"
}
Wow! Such a big block of code. 😲 Let’s do the postmortem of it to understand it step-by-step.
If checking the 8th line, you’ll find referencing the encryption key for the data linked in the L248. This is necessary to detect as it will become our key to securing the GitHub action artifacts located in the Amazon S3 buckets. Make a deep dive into the KMS through the official source!
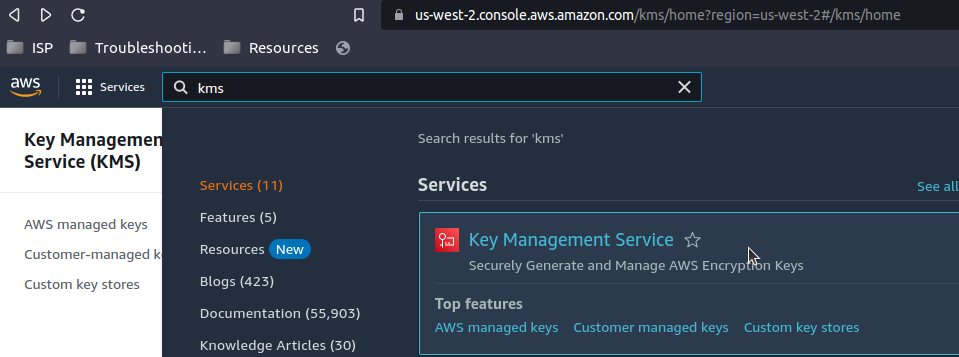
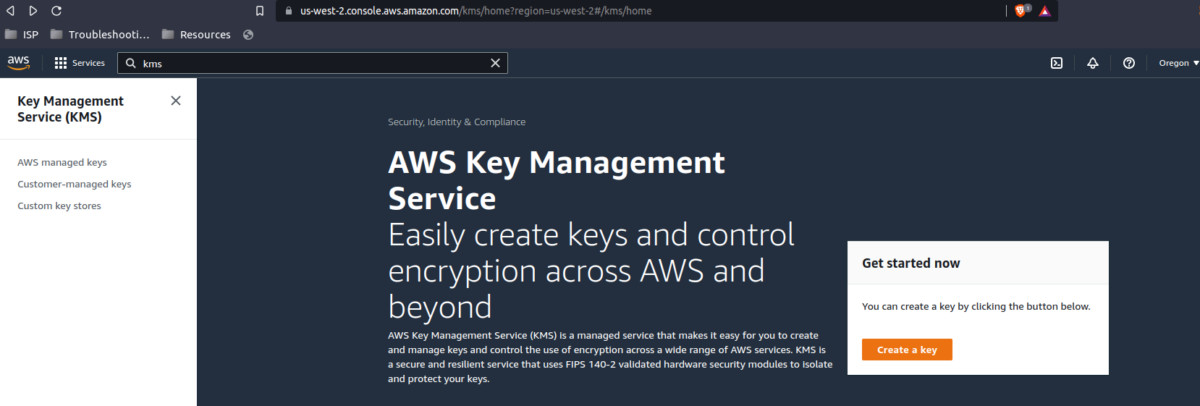
Follow the below steps to create a KMS key.
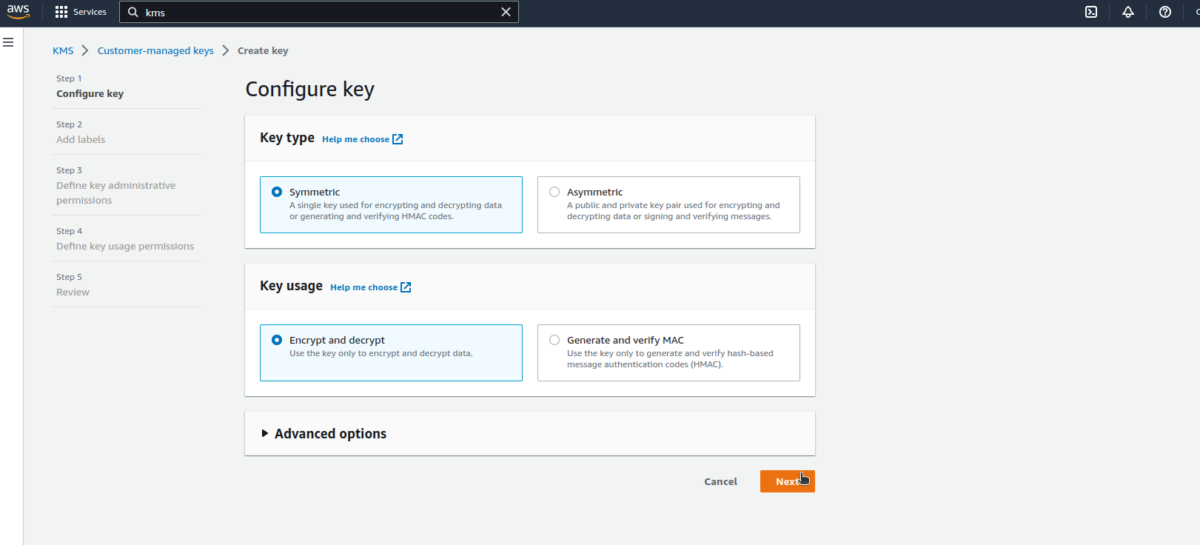
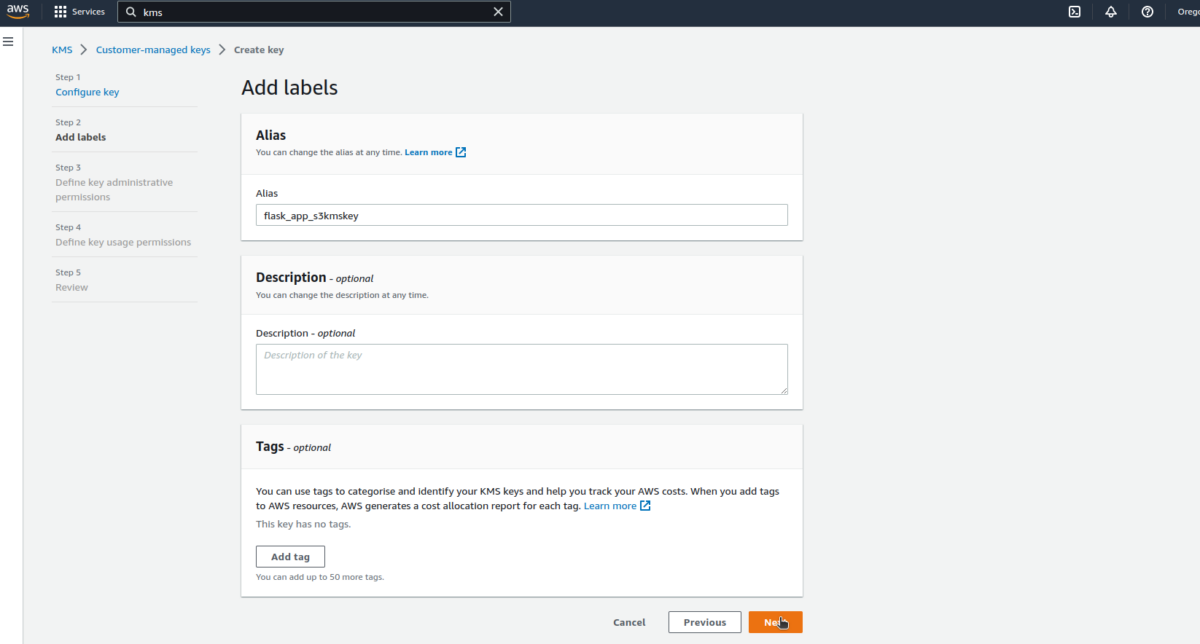
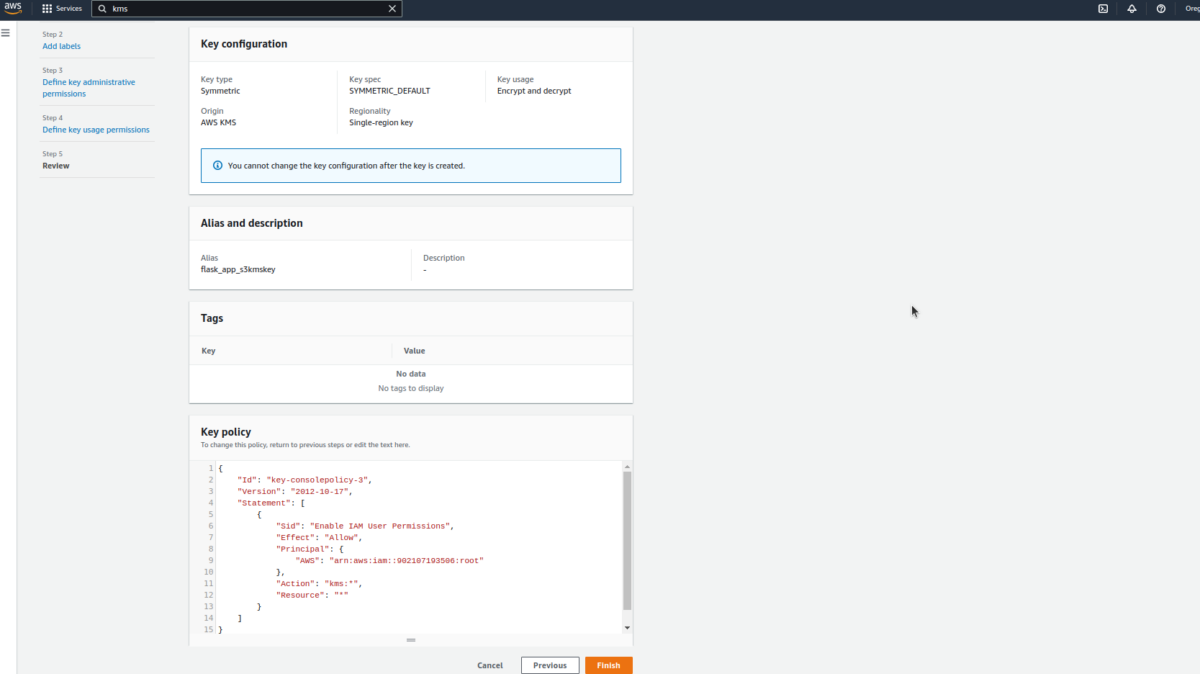
So many processes blowing off 🤯our minds, aren’t they? Let’s take a detour of the code to understand it nicely.
The L1-43 are used to create CodePipeline resources, each linked in different stages.
Refer to this link to find Terraform resources.
Lines 12-41 are used to define two stages in the CodePipeline.
Apart from that, the deploy stage plays a pretty important role in the CodePipeline configuration. Therefore, it is greyed out in the Terraform architecture
The source stage is simply used to connect the pipeline with the GitHub repository with the command CodeStarSourceConnection.
📝Note: Remember, this command: CodeStarSourceConnection is only used when using the source code from GitHub, Bitbucket, and GitHub Enterprise Server.
See the L126, where the build stage is mentioned with CodeBuild to build and deploy the app located in the aws_codebuild_project resource configuration file. You can even use a close alternative to this, which is – Custom Jenkins.
This source phase also represents the output artifact in the form of an input artifact in the build stage.
See lines 55-125 to check how CodePipeline roles and policies are created, which is important for its associated S3 bucket, CodeStar, IAM, KMS, and CodeBuild activities.
See Lines 126-172 to create a CodeBuild resource asking to use a Linux container to pass the environmental variables into the build, alongside the use of a buildspec file in the source block.
See lines 173-247 where CodeBuild’s roles and policies are declared, which plays an important role in accessing the IAM, S3 bucket, ECR, and ECS.
Uff! 😮💨Finally the relief of explaining a bunch of configurations. Let’s move on to the application of our setup.
It’s directory tree checking time! ⌚
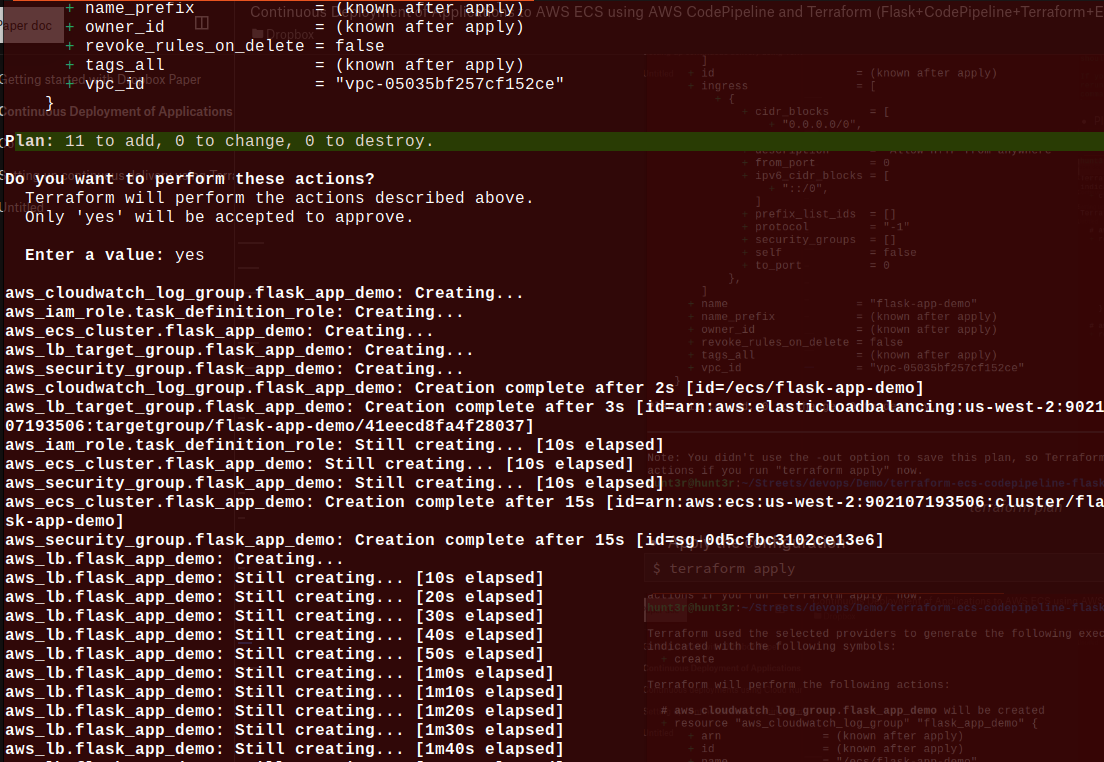
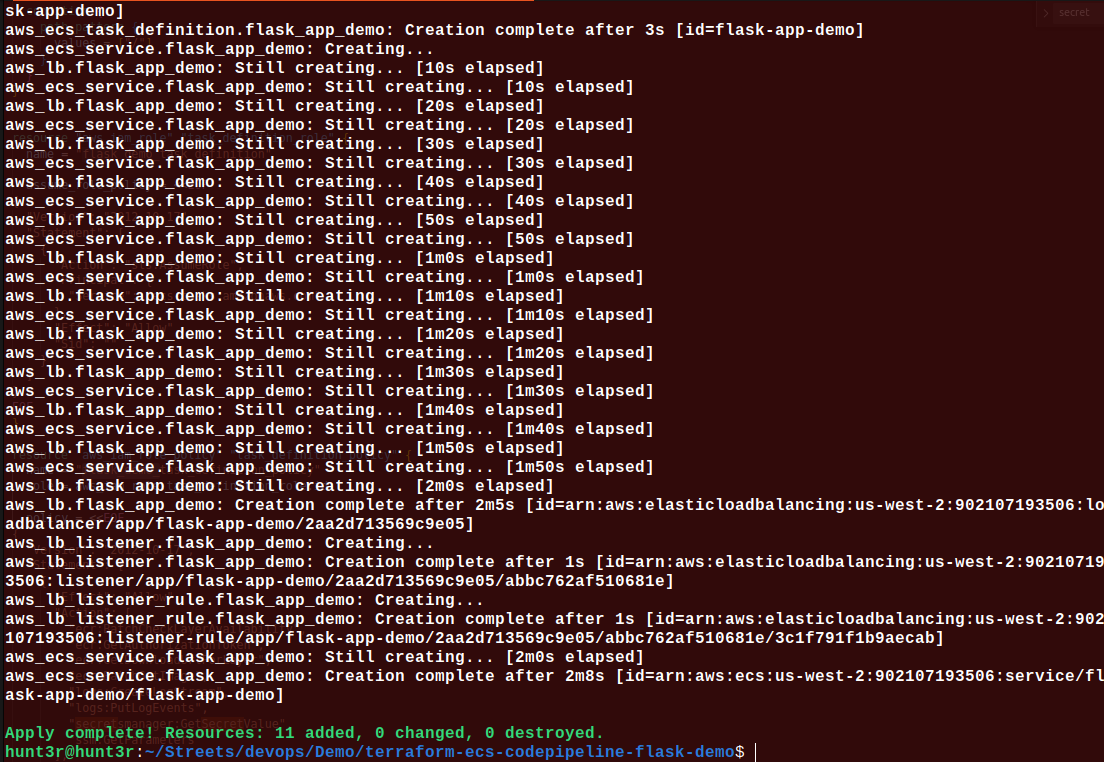
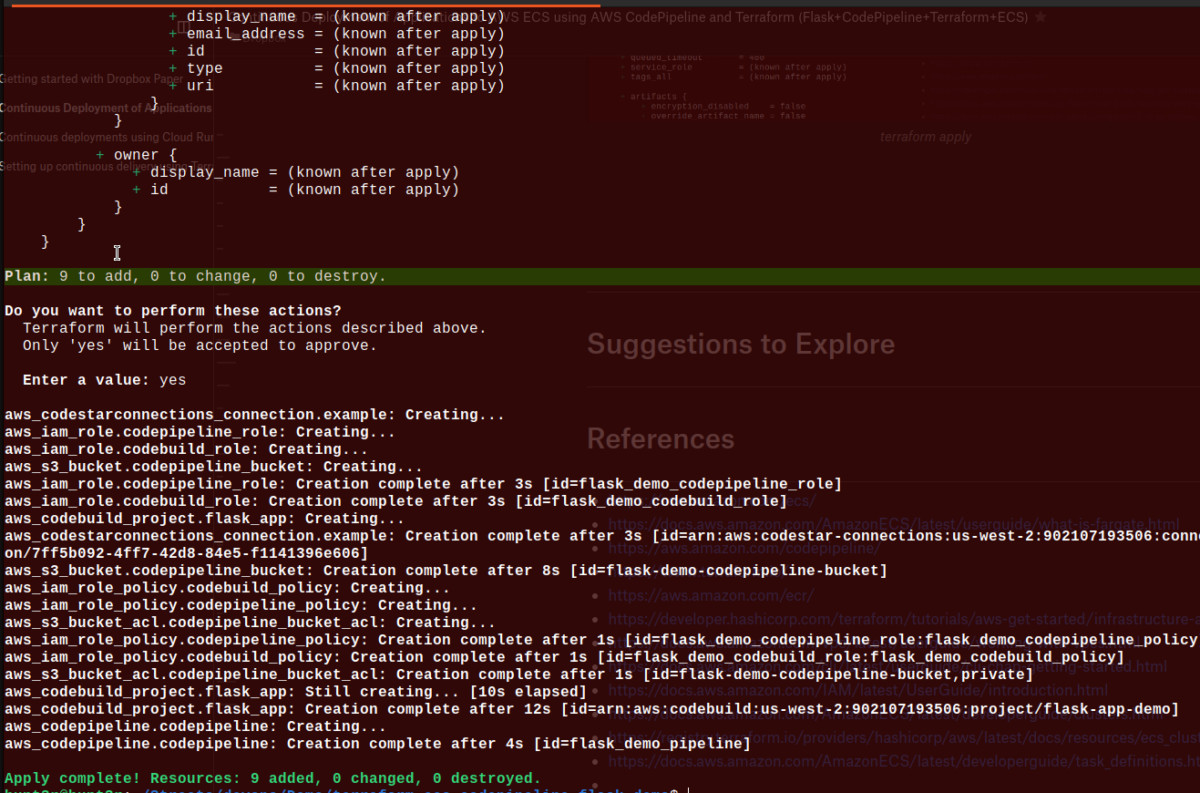
Now, let’s apply the configuration with the use of Terraform:
Here’s the command for it: $ terraform apply
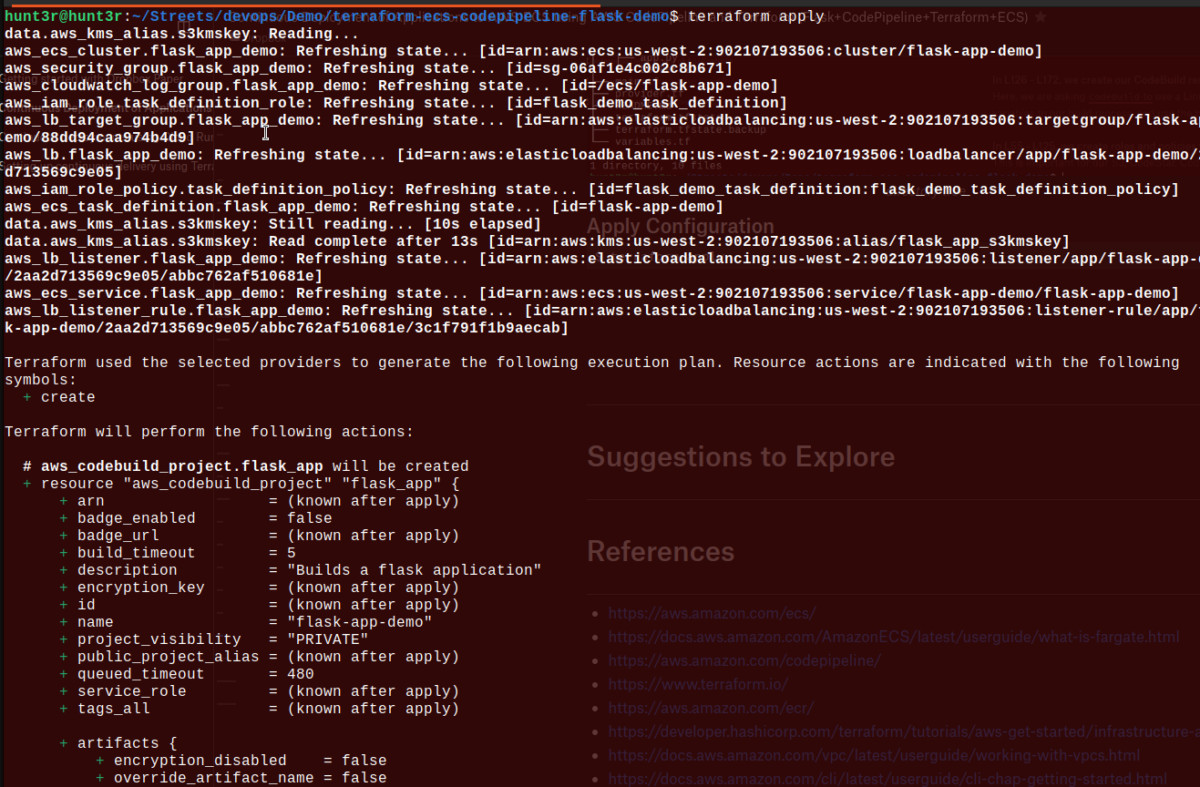
Implementation Verification Time ⌚
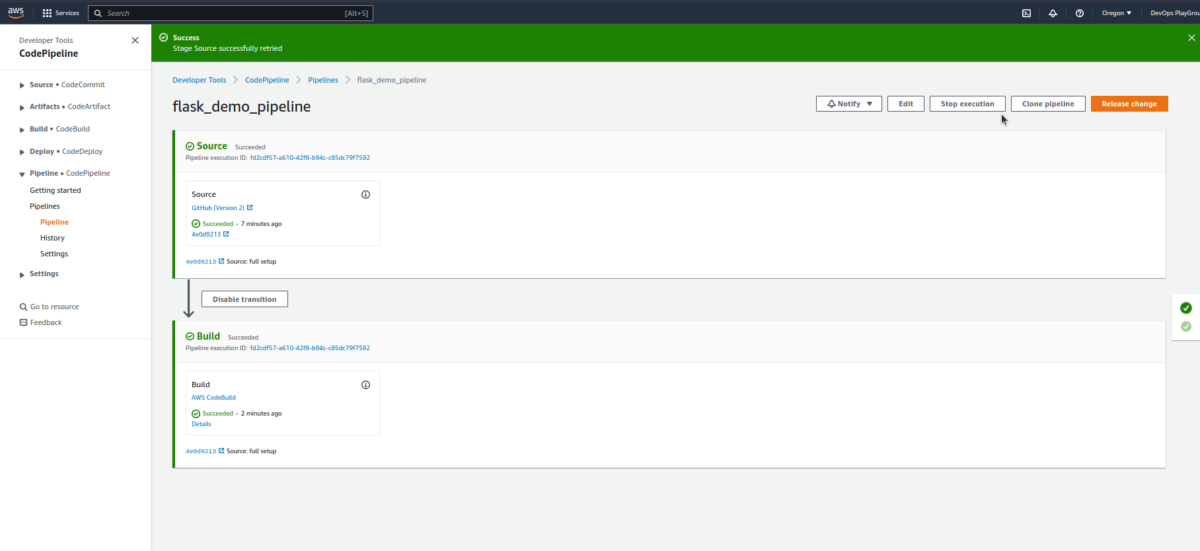
Let’s begin with checking the CodePipeline!
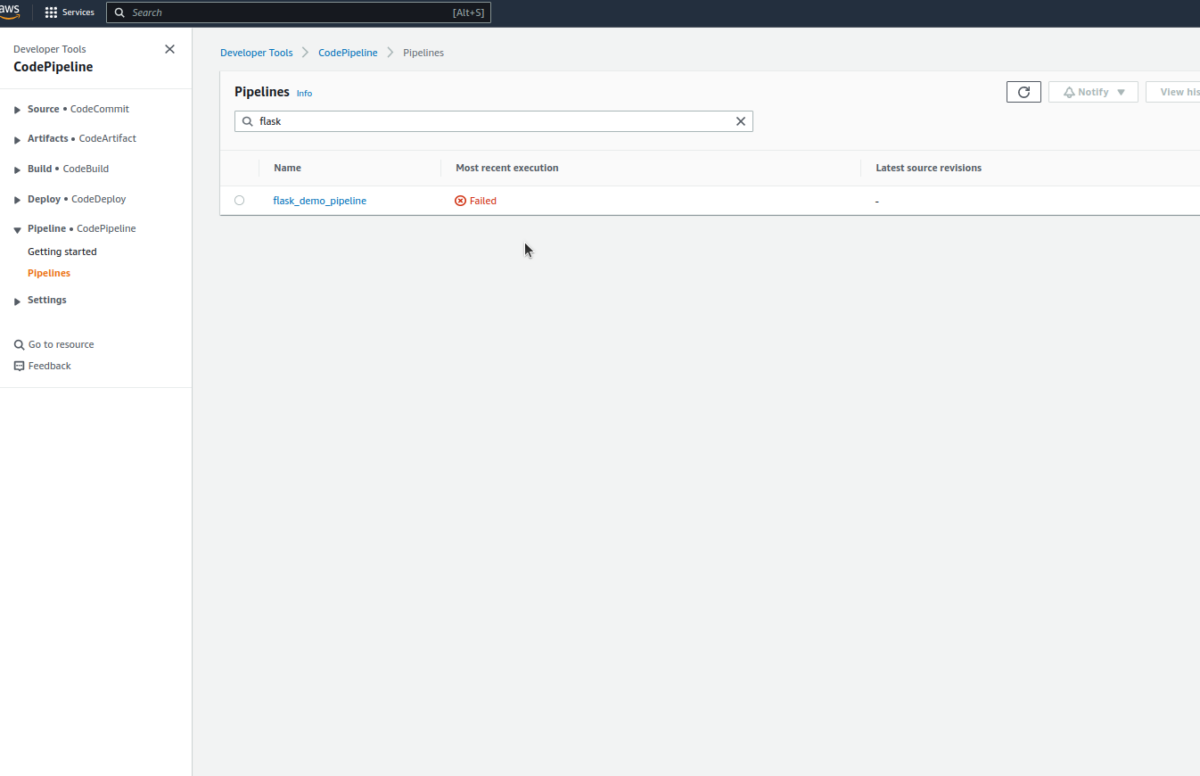
There are times when the first attempt does fail, as we require to authenticate the GitHub connection. Hence, you’ll detect an error like this as shown below:
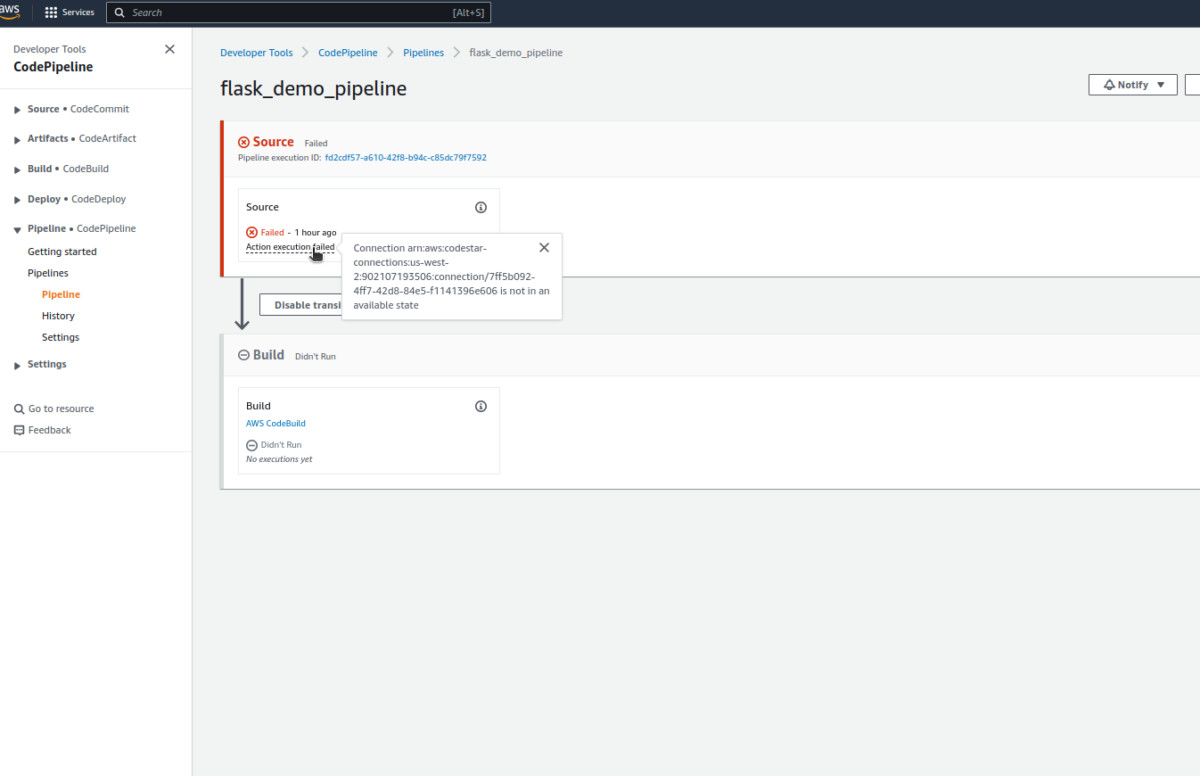
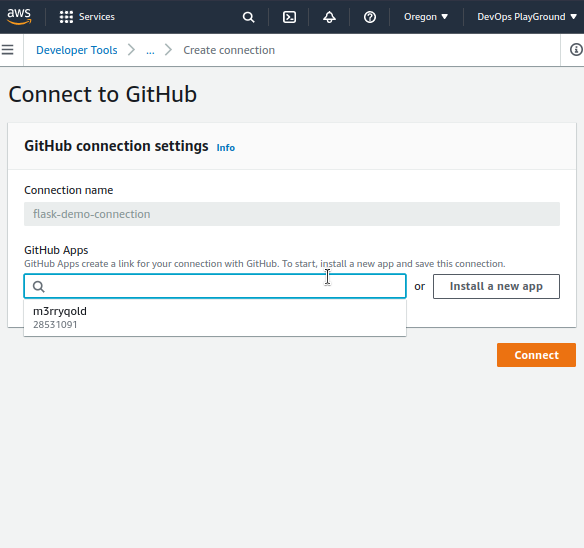
Now, let’s Authorize the GitHub connection by following this path: Navigate to Settings>Connections;
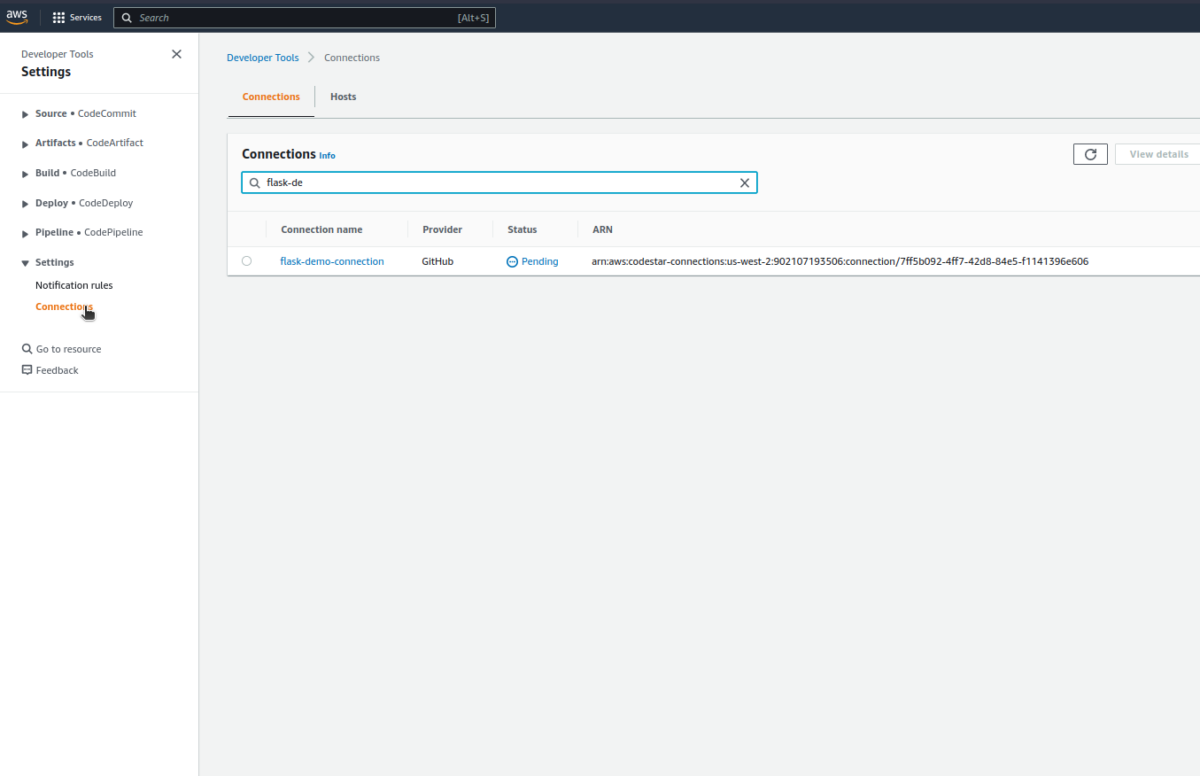
Once we’ll update the GitHub connection request, we’re all good to delve in:
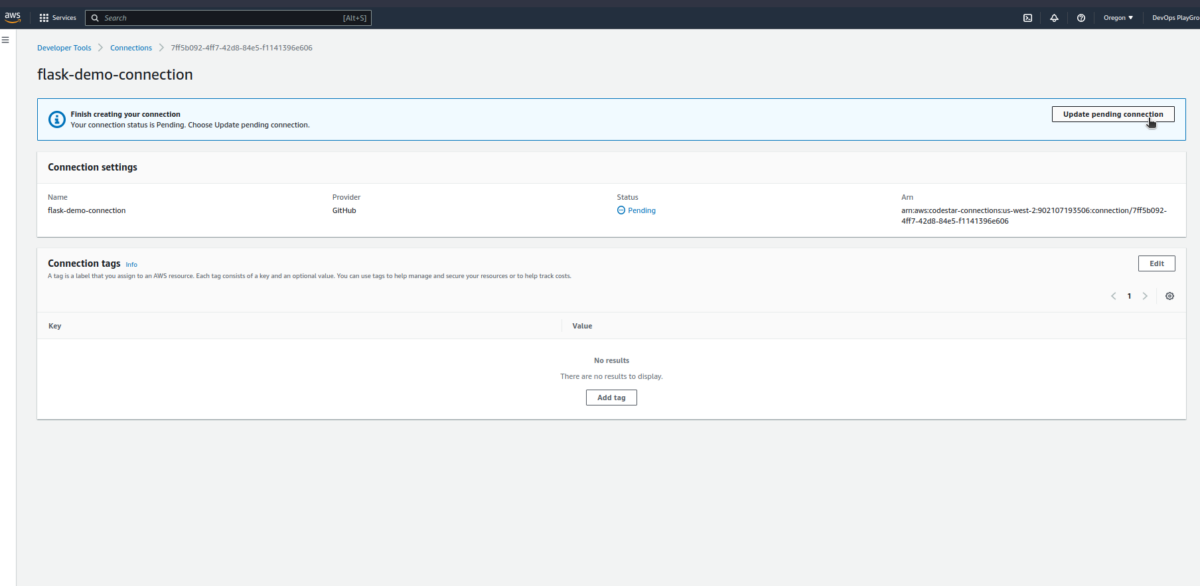
As we update the connection, the status will change into Available.

Now, push the local Flask app source code to the GitHub repository and observe the pipeline stages and status;
$ git status
$ git add .
$ git commit -m "full setup"
$ git push origin main
If triggering the pipeline at this moment, it will throw an error like this:
[GitHub] Upload to S3 failed with the following error: The ciphertext refers to a customer master key that does not exist, does not exist in this region, or you are not allowed to access.
The error indicates a missing link to the KMS key with the CodePipeline and CodeBuild roles. But worry not! It can be done right now as well 😌:
Now, open flask_app_s3kmskey
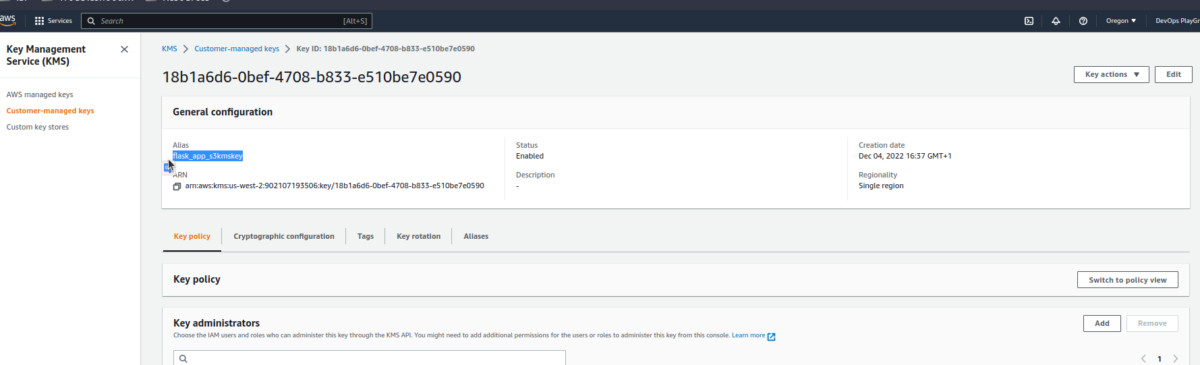
Scroll down a bit and now make the link as discussed above:
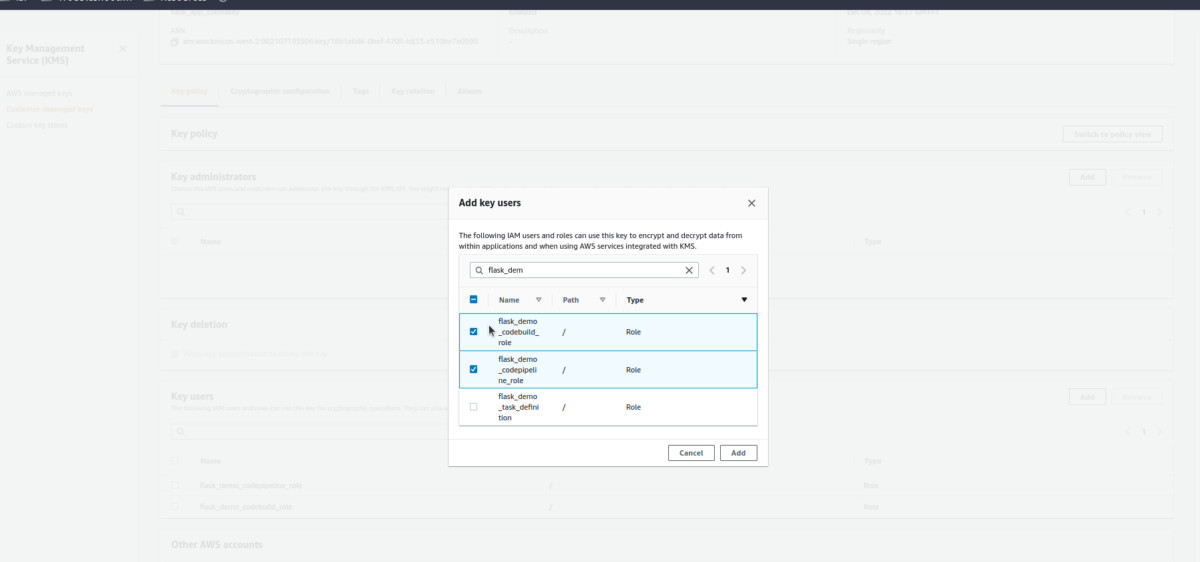
To see the results, it’ll ask for rerunning the Pipeline, which is not an issue 🤓
Open the AWS CodeBuild to see some more information:
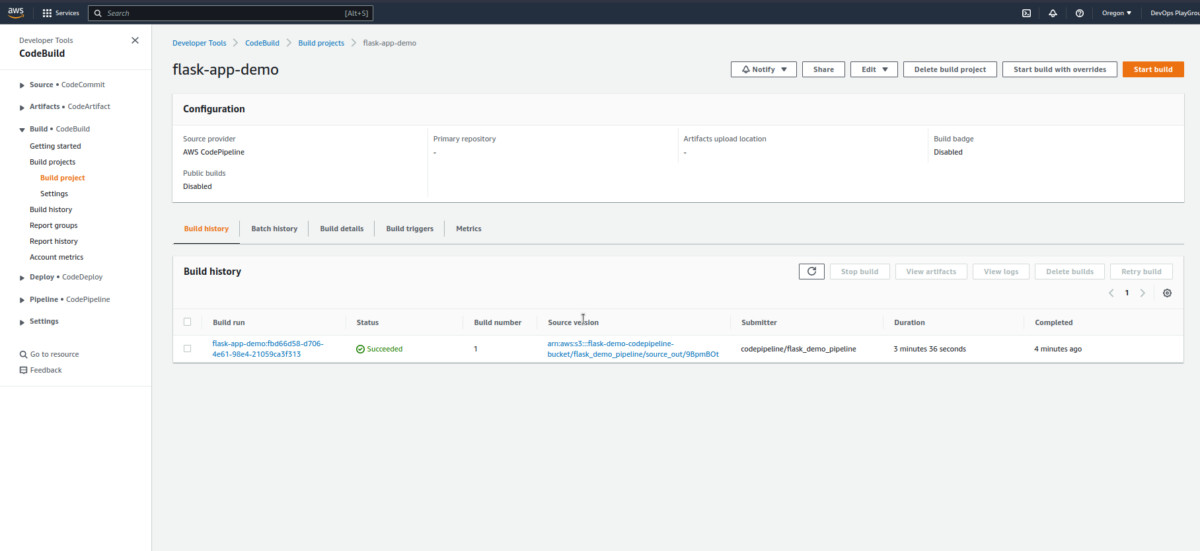
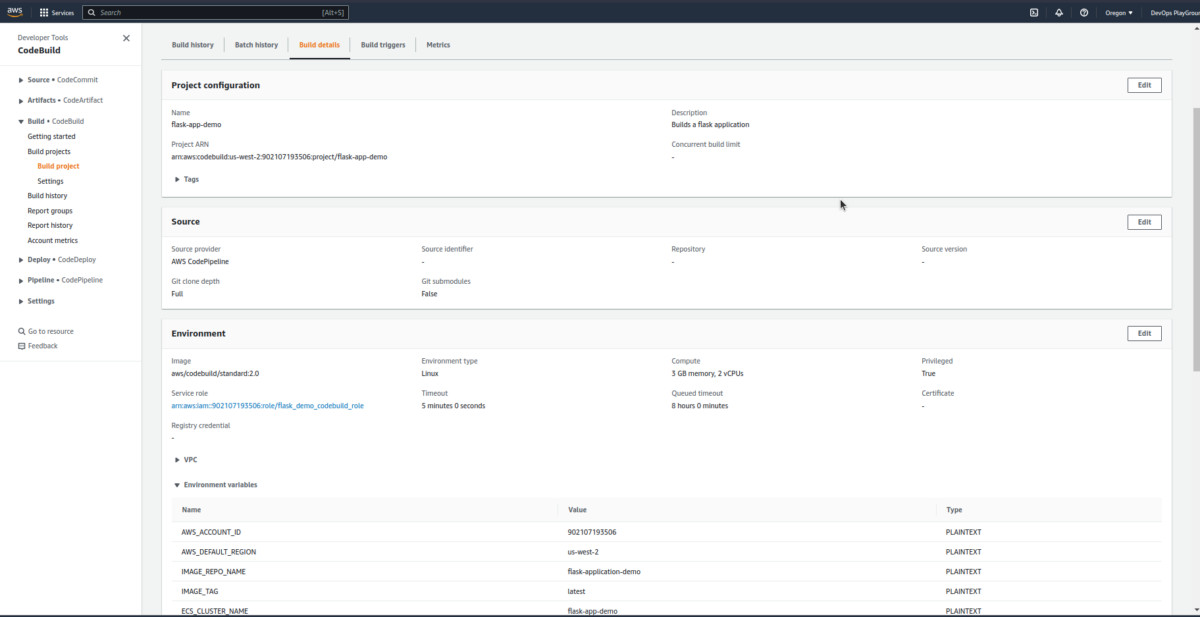
Now, click on the latest build run from the history to check some information regarding the same:
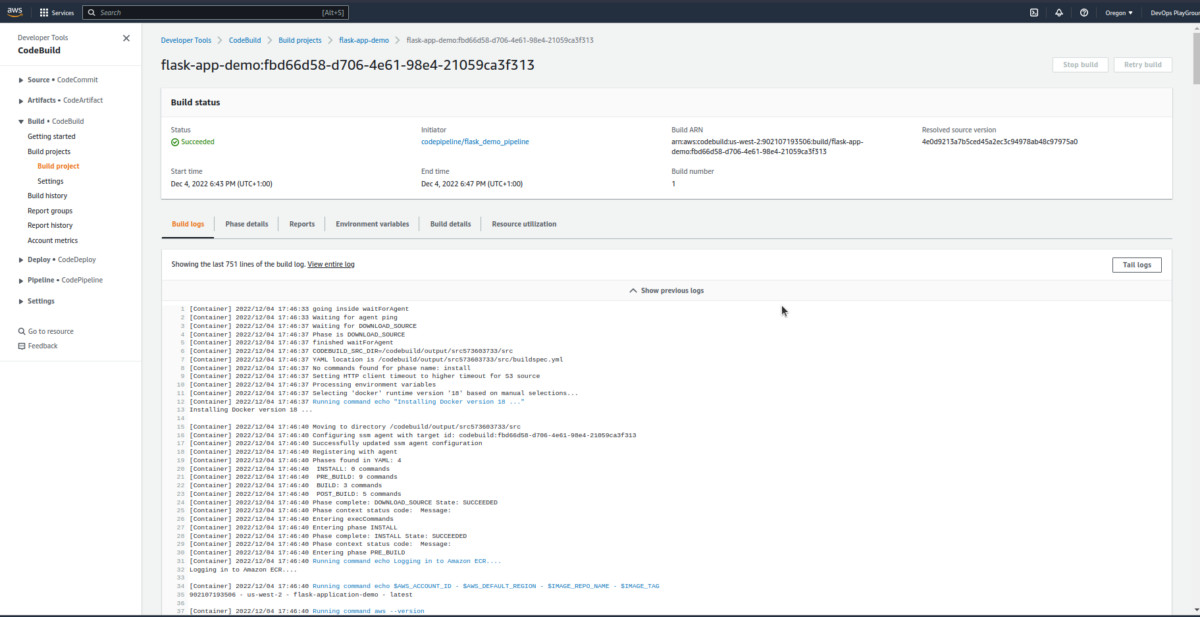
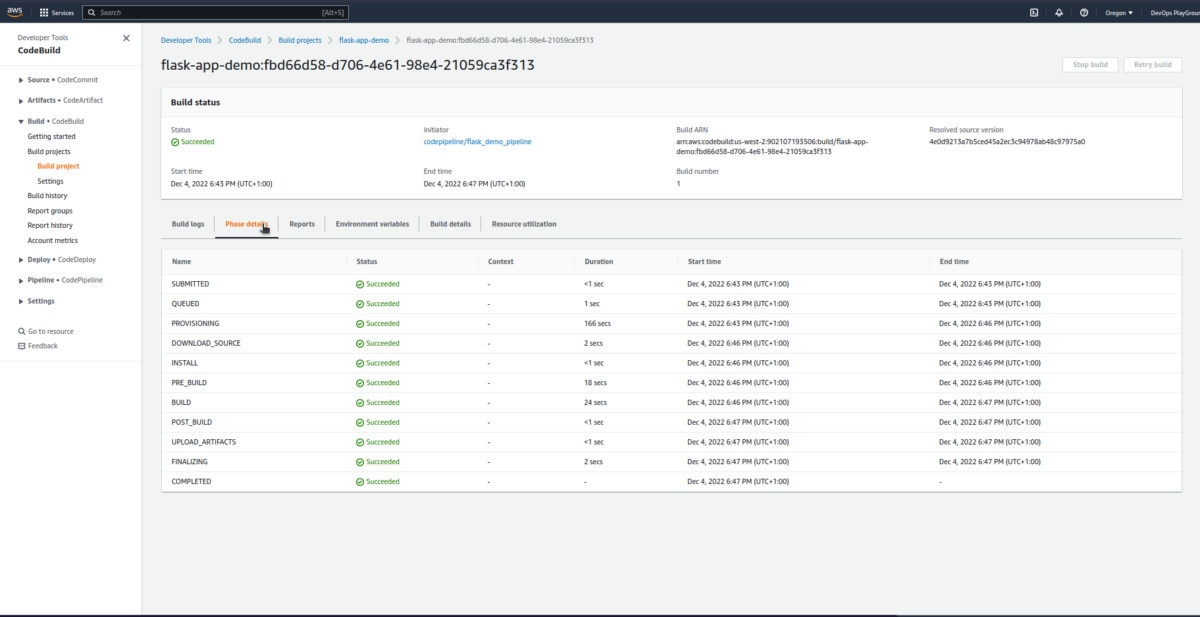
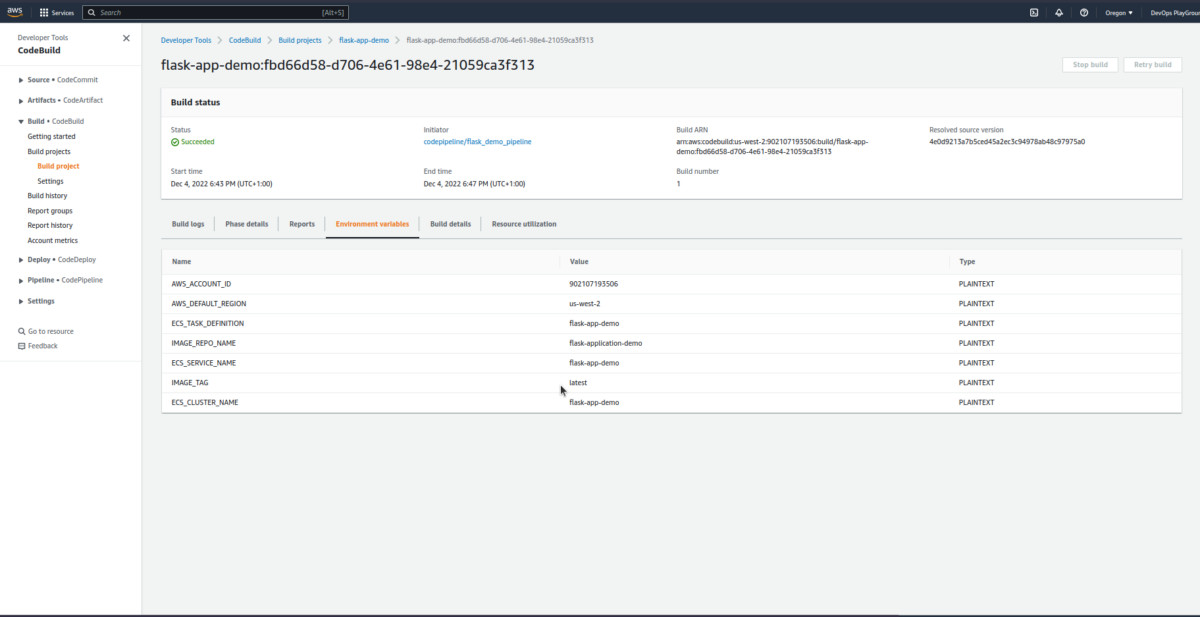
Now, you know how to explore more information! The genius you! 😎
Shall we now move forward to the ECS verification? Let’s go!
ECS Verification
Search for the ECS cluster, we just created to check the cluster information:

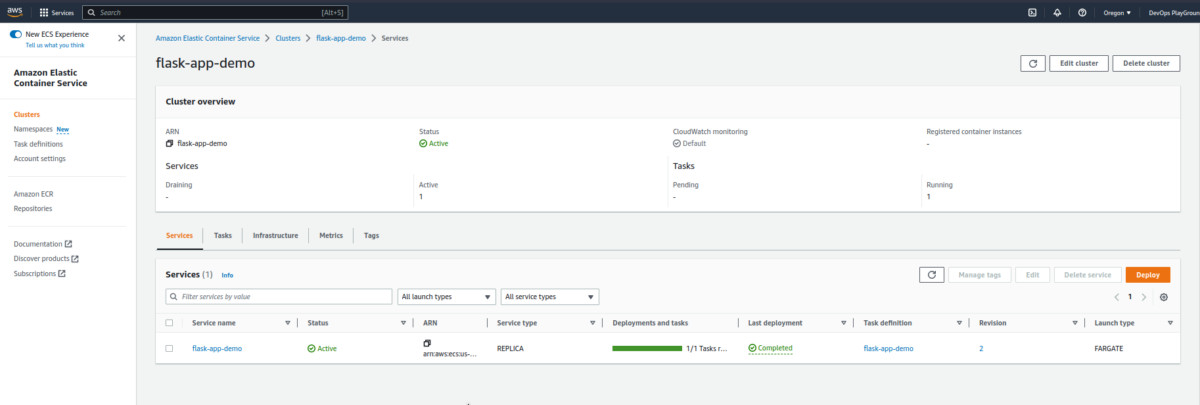

Now, follow this path to check the networking configuration: Clusters > Services > flask-app-demo > Networking
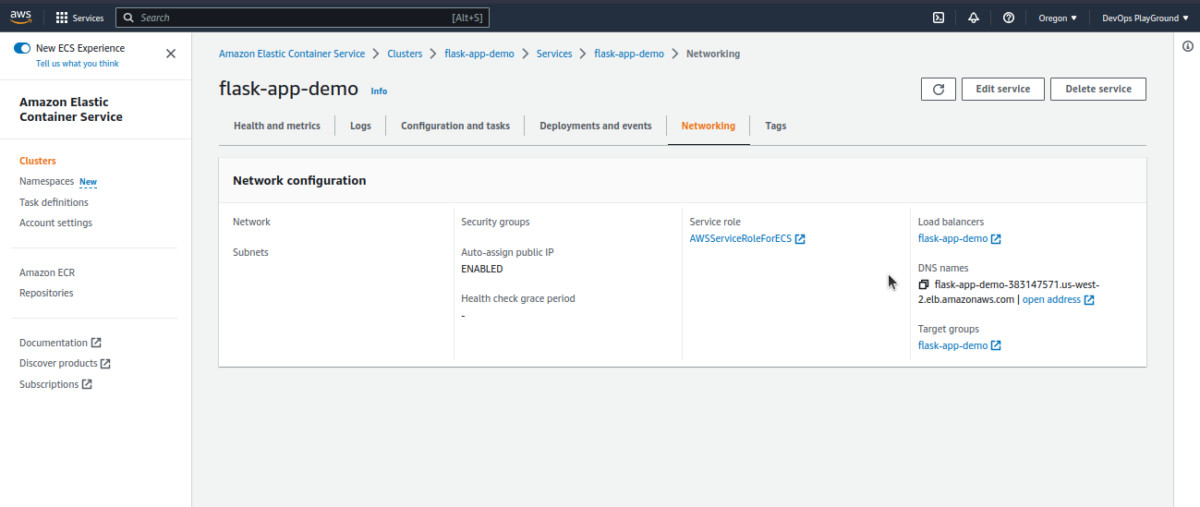
When you see the load balancer URL, click on it, and voila, you can see your first Flask Application ready – AKA the deployed version of the app.
Now, moving on to the Continuous Deployment Verification process:
At first, you’ll need to update the flask application: flask_app/app.py
from flask import Flask
app = Flask(__name__)
@app.route("/")
def hello():
    return "Yayy, we have the 2nd version of our flask application"
if __name__ == "__main__":
    app.run(host="0.0.0.0")
Then push the application code to the GitHub, like this:
$ git status
$ git add .
$ git commit -m "update flask app"
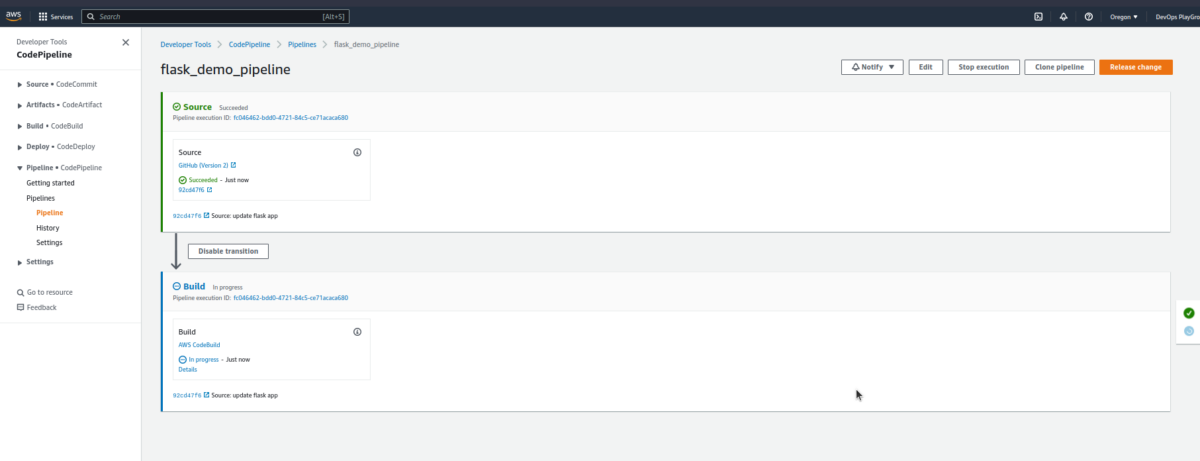
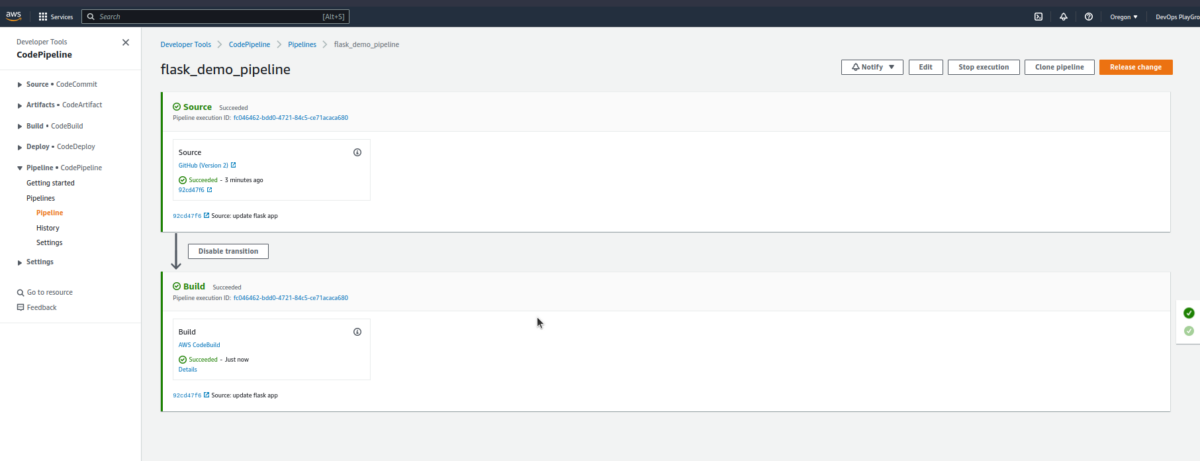
$ git push origin mainThere’ll also a requirement to check the Pipeline – done like this:
Once the build is done, you can check the information reflected on the app like this:
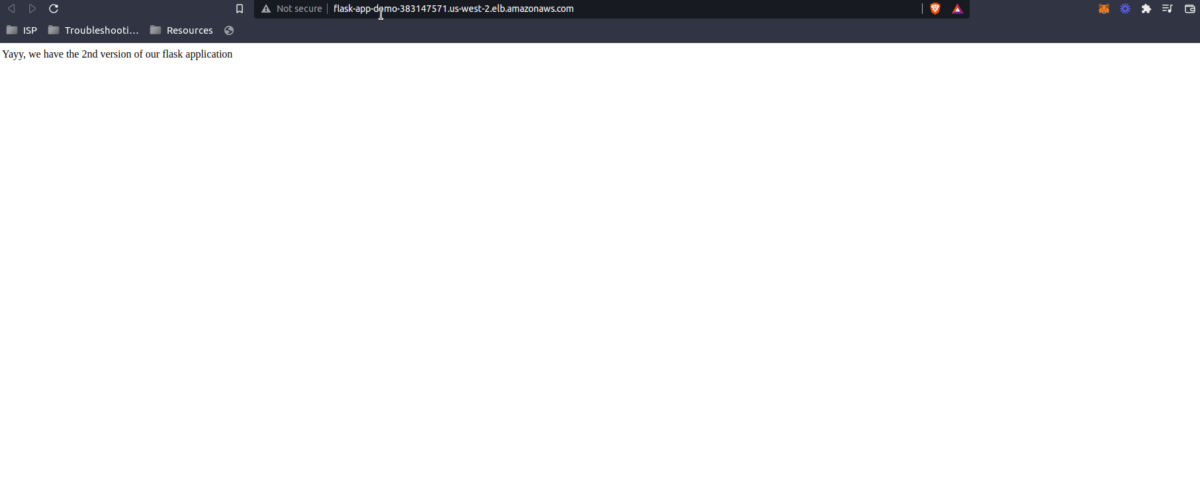
Woohoo! 🥳 You’ve now excelled at deploying the application into the AWS ECS using AWS CodePipeline and Terraform!
Conclusion
You’ve done a great job so far! However, you can optimize this process a bit by taking some suggestions, like this:
- Automating the configuration by terraform gitlab with GitHub or GitLabCI;
- Finding out and experimenting with more AWS CodePipeline use cases (for example, how will you get approvals before deploying the app?);
-
Finally, make the most out of AWS CodePipeline to deploy other AWS services, like Amazon EBS.
Keep trying, keep experimenting, and keep striving for excellence! That’s what we promote at Tuvoc Technologies.

Kishan Lashkari
Kishan Lashkari is the Operations Manager at Tuvoc Technologies with 12+ years in IT operations and software development. He helps startups and enterprises build custom software using technologies like PHP and Laravel with seamless user experience.

Have an Idea? Let’s Shape It!
Kickstart your tech journey with a personalized development guide tailored to your goals.
Discover Your Tech Path →Share with your community!
Latest Articles

When to Choose a White Label Real Estate App Development Company and Why?
Most real estate businesses we talk to aren't short on leads or deals. Even your search for a white-label real…

Real-Time Payment Infrastructure Architecture: Why Money Can No Longer Move at Yesterday’s Speed
Blog Summary Money still moves through infrastructure built for another era Consumer expectations are reshaping payment system priorities Real-time payments…
Cost to Develop a Real Estate App Like Zillow or Trulia
This Blog Explains: Cost Breakdown: Understand what actually increases Zillow-like app development expenses Infrastructure Reality: Learn why MLS systems change…
